
Shoulder exercises are an essential part of any workout routine. They help to build strength, improve posture, and prevent injury. One of the most effective ways to work your shoulders is by using cable machines. In this article, we will be discussing some of the best shoulder exercises that you can do with a cable machine.
What is a Cable Machine?

A cable machine is a piece of gym equipment that consists of a weight stack connected to a cable and pulley system. This machine allows you to perform a wide range of exercises that target different muscle groups. Cable machines are versatile, easy to use, and offer a variety of resistance levels.
Benefits of Shoulder Exercises with Cable

Shoulder exercises with cable offer several benefits. Firstly, they allow you to work your shoulders from different angles, which helps to build well-rounded and defined shoulders. Secondly, cable machines provide constant tension throughout the entire range of motion, making them more effective than other types of machines. Finally, cable machines allow you to adjust the weight easily, making them suitable for beginners and experienced lifters alike.
Top 5 Shoulder Exercises with Cable
1. Cable Front Raise: This exercise targets the front deltoids. Stand facing the cable machine with a cable in each hand. Raise your arms in front of your body until they are parallel to the ground. Lower slowly and repeat.
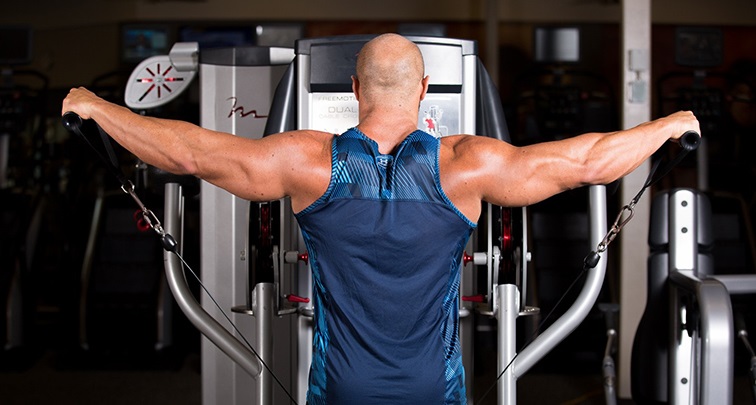
2. Cable Lateral Raise: This exercise targets the side deltoids. Stand with your side to the cable machine, holding a cable in one hand. Raise your arm out to the side until it is parallel to the ground. Lower slowly and repeat.
3. Cable Rear Delt Fly: This exercise targets the rear deltoids. Stand facing away from the cable machine with a cable in each hand. Pull your arms back and squeeze your shoulder blades together. Lower slowly and repeat.
4. Cable Shoulder Press: This exercise targets all three heads of the deltoids. Stand facing the cable machine with a cable in each hand. Press the cables up above your head and lower slowly.
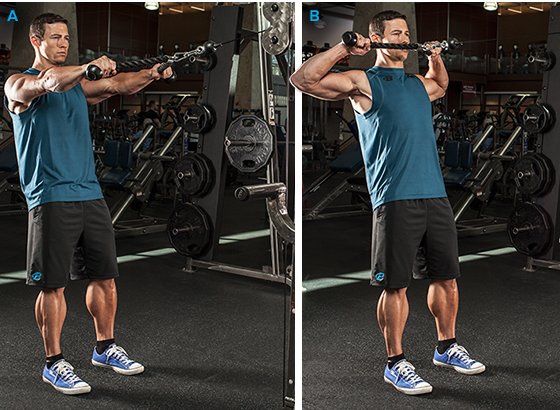
5. Cable Face Pull: This exercise targets the rear deltoids and upper back. Attach a rope to the cable machine and stand facing it. Pull the rope towards your face, keeping your elbows high. Lower slowly and repeat.
Tips for Performing Shoulder Exercises with Cable
1. Start with a light weight and gradually increase it.
2. Keep your core engaged and your back straight.
3. Use slow and controlled movements.
4. Focus on squeezing your shoulder muscles at the top of each movement.
5. Breathe in as you lower the weight and breathe out as you raise it.
6. Rest for at least 30 seconds between sets.
7. Always warm up before starting your workout.
Conclusion
Shoulder exercises with cable are a great way to build strength, improve posture, and prevent injury. Incorporate these exercises into your workout routine to achieve well-defined and strong shoulders. Remember to use slow and controlled movements, start with a light weight, and focus on squeezing your shoulder muscles at the top of each movement.
Related video of Shoulder Exercise With Cable

The seated row narrow grip is one of the most effective exercises for building a strong back, shoulders, and arms. This exercise targets the muscles of the upper back, including the rhomboids, trapezius, and rear deltoids, while also working the biceps and forearms. In this article, we'll cover everything you need to know about performing the seated row narrow grip, including proper form, variations, and benefits.
Proper Form

The seated row narrow grip is typically performed on a cable machine or a rowing machine. Begin by sitting on the machine with your feet firmly planted on the ground and your knees slightly bent. Grasp the handle with an overhand grip, making sure your hands are shoulder-width apart. Keep your back straight and engage your core throughout the exercise.
With your arms extended in front of you, pull the handle towards your body, keeping your elbows close to your sides. Squeeze your shoulder blades together at the top of the movement, then slowly release back to the starting position. Repeat for the desired number of repetitions.
Variations

There are several variations of the seated row narrow grip that you can incorporate into your workout routine to target different areas of the back and arms. Some variations include:
- Close-grip seated row
- Reverse-grip seated row
- Single-arm seated row
- T-bar row
Experiment with different variations to find what works best for you and your fitness goals.
Benefits

The seated row narrow grip offers a number of benefits for your overall fitness and well-being, including:
- Improved posture and spinal health
- Increased upper body strength and muscle mass
- Reduced risk of injury in the shoulders and back
- Improved grip strength and forearm development
- Better overall athletic performance
By incorporating the seated row narrow grip into your workout routine, you can enjoy these benefits and more.
Tips for Success

Follow these tips to get the most out of your seated row narrow grip exercise:
- Focus on proper form and technique
- Engage your core throughout the exercise
- Gradually increase weight and reps over time
- Incorporate variation into your routine
- Stretch before and after your workout to prevent injury
By following these tips, you can ensure that you're performing the seated row narrow grip safely and effectively.
Conclusion
The seated row narrow grip is an excellent exercise for building a strong, healthy back and improving overall fitness. By following proper form and incorporating variation into your routine, you can enjoy the many benefits of this exercise. Remember to listen to your body, gradually increase weight and reps, and always prioritize proper form and technique.
Related video of Seated Row Narrow Grip: A Complete Guide

Front squats are one of the most effective exercises for building lower body strength and power. They target the quadriceps, hamstrings, glutes, and core muscles, and are a staple in most strength training programs. However, proper hand placement is essential for performing front squats correctly and maximizing their benefits. In this article, we'll discuss the different hand placement options for front squats and how to choose the right one for you.
Why Hand Placement Matters
The position of your hands during front squats affects your ability to maintain proper form and balance, as well as the level of stress placed on your wrists, elbows, and shoulders. Incorrect hand placement can lead to discomfort, injury, and reduced performance. Therefore, it's crucial to understand the different options and their pros and cons.
Crossed Arm Grip
The crossed arm grip is the most common hand placement for front squats. To perform this grip, you place your palms facing up under the barbell and cross your arms, resting the bar on your front deltoids. This grip allows you to keep your elbows high, which helps maintain an upright torso and proper spinal alignment. It also reduces stress on your wrists and shoulders by distributing the weight across your upper arms. However, some people find this grip uncomfortable or restrictive, especially if they lack flexibility in their shoulders or wrists.
Clean Grip

The clean grip, also known as the Olympic grip, is a more advanced hand placement that requires greater wrist flexibility and upper body mobility. With this grip, you place your palms facing down on the bar and wrap your fingers around it, similar to the grip used in the clean exercise. The bar rests on your front deltoids and upper chest, and your elbows are raised high. This grip allows for a more comfortable and secure grip on the bar, which can help with heavier weights. It also requires less upper body flexibility than the crossed arm grip. However, it can be challenging to learn and may cause discomfort or strain on your wrists and forearms.
Zercher Grip
The Zercher grip is a less common hand placement for front squats but can be effective for targeting different muscle groups and improving core stability. With this grip, you hold the bar in the crook of your elbows, with your palms facing up and your fingers crossed. The bar rests on your forearms and upper chest, and your elbows are kept close to your body. This grip places greater stress on your biceps, forearms, and core muscles, which can help improve overall strength and stability. However, it can be uncomfortable or painful for some people, and it may require additional warm-up and mobility work.
How to Choose the Right Hand Placement
The best hand placement for front squats depends on your individual goals, preferences, and physical limitations. Here are some factors to consider:
- Your level of flexibility and mobility in your wrists, shoulders, and forearms
- Your ability to maintain proper form and balance with each grip
- Your experience and familiarity with each grip
- The specific muscles you want to target or strengthen
- Your training goals, such as building strength, power, or muscle mass
Experiment with each hand placement and see which one feels most comfortable and effective for you. Start with lighter weights and gradually increase the load as you improve your technique and form.
Tips for Proper Hand Placement
Regardless of which grip you choose, there are some general tips to keep in mind for proper hand placement during front squats:
- Keep your elbows high and close to your body
- Maintain a neutral wrist position
- Keep your core engaged and your spine neutral
- Breathe deeply and maintain proper breathing technique
- Use grip aids such as wrist wraps or lifting straps if needed
Conclusion
Front squats are an excellent exercise for building lower body strength and power, but proper hand placement is essential for performing them correctly and safely. Experiment with different grips and find the one that works best for you based on your goals, preferences, and physical limitations. Remember to maintain proper form and technique, breathe deeply, and use grip aids if needed. With consistent practice and dedication, you can master the front squat and reap its many benefits.
Related video of Front Squat Hand Placement

If you're looking for an exercise that can target your shoulder and upper back muscles, then you might want to try cable rope face pulls. This exercise is popular among bodybuilders and fitness enthusiasts because it can help improve posture, strengthen upper body muscles, and reduce the risk of injury. In this article, we'll discuss the benefits of cable rope face pulls, how to perform the exercise correctly, and some variations that you can try.
What are Cable Rope Face Pulls?
Cable rope face pulls are a type of exercise that involves pulling a rope attached to a cable machine towards your face. The exercise primarily targets your rear deltoids, upper back muscles, and rotator cuff muscles. It also engages your biceps, triceps, and forearm muscles.
Benefits of Cable Rope Face Pulls

There are several benefits of cable rope face pulls, including:
- Improved Posture: Cable rope face pulls can help improve your posture by strengthening your upper back muscles, which are responsible for pulling your shoulders back and down.
- Reduced Risk of Injury: Strong upper back muscles can also help prevent injuries, especially if you perform exercises that involve lifting heavy weights.
- Increased Strength: Cable rope face pulls can help increase your overall upper body strength by targeting several muscle groups at once.
- Improved Shoulder Mobility: The exercise can also help improve your shoulder mobility by engaging your rotator cuff muscles, which are responsible for stabilizing your shoulder joint.
- Reduced Neck and Shoulder Pain: If you spend a lot of time sitting at a desk or looking at a computer screen, you might experience neck and shoulder pain. Cable rope face pulls can help alleviate these symptoms by strengthening the muscles that support your neck and shoulders.
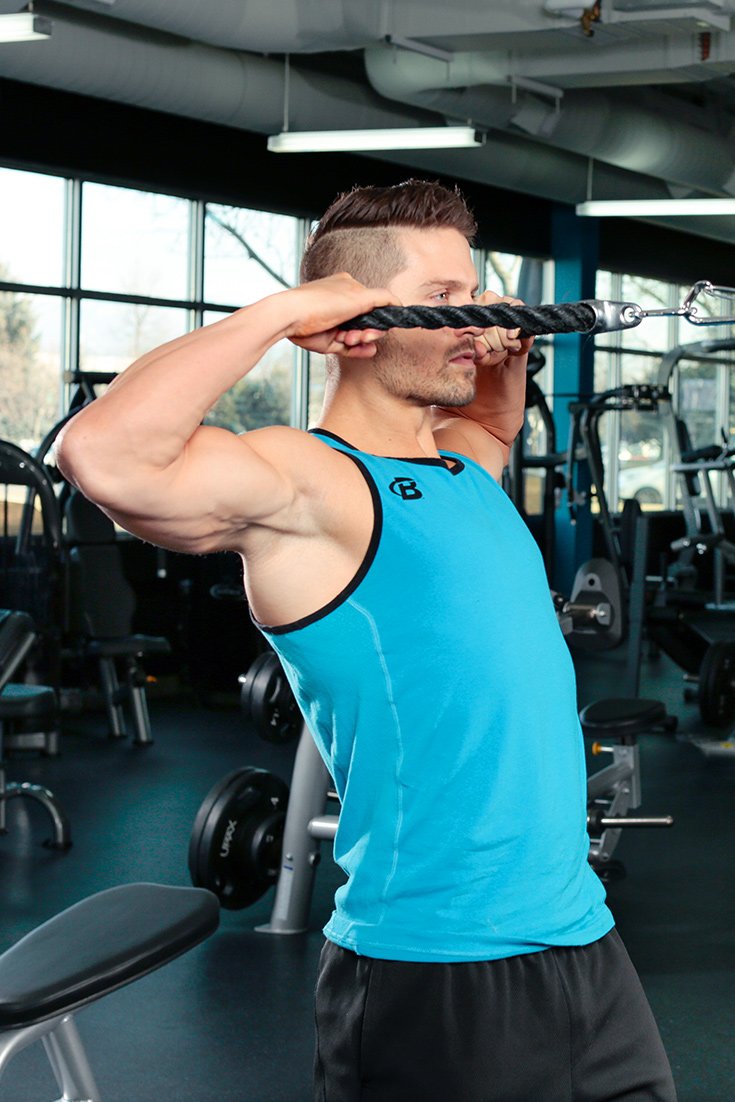
How to Perform Cable Rope Face Pulls

Follow these steps to perform cable rope face pulls correctly:
- Attach a rope to a cable machine at chest height.
- Grab the rope with both hands using an overhand grip.
- Step away from the machine and lean back slightly, keeping your arms straight and your feet shoulder-width apart.
- Pull the rope towards your face, keeping your elbows high and your shoulders down.
- Pause for a second, then slowly lower the rope back to the starting position.
- Repeat for the desired number of reps.
Make sure to keep your back straight and your core engaged throughout the exercise. Avoid using momentum to pull the rope, and focus on using your upper back muscles to perform the movement.
Variations of Cable Rope Face Pulls

Here are some variations of cable rope face pulls that you can try:
- Single-Arm Cable Rope Face Pulls: Perform the exercise using one arm at a time to increase the challenge and engage your core muscles.
- Reverse Cable Flyes: Instead of pulling the rope towards your face, pull it away from your body to target your rear deltoids and upper back muscles.
- Cable Rear Delt Flyes: Stand facing away from the cable machine and pull the rope towards your hips, targeting your rear deltoids and upper back muscles.
Conclusion
Cable rope face pulls are a simple yet effective exercise that can help improve your posture, increase your upper body strength, and reduce the risk of injury. By performing the exercise correctly and incorporating variations into your workout routine, you can target different muscle groups and achieve your fitness goals.
Related video of Cable Rope Face Pulls: An Effective Exercise for Shoulder and Upper Back Muscles

Toe touches with medicine ball is a great exercise for building core strength and improving balance. It involves lifting a medicine ball with your feet while lying on your back, and then reaching up to touch the ball with your hands. This exercise is perfect for people of all fitness levels, as it can be modified to suit different abilities.
How to Do Toe Touches With Medicine Ball

To perform toe touches with medicine ball, you will need a medicine ball and a mat. Here are the steps:
- Lie on your back with your legs straight and your arms extended above your head, holding the medicine ball.
- Lift the medicine ball with your feet, keeping your legs straight.
- Slowly lift your head and shoulders off the ground, reaching up to touch the medicine ball with your hands.
- Lower your head and shoulders back down to the ground, and then lower the medicine ball back down to your feet.
- Repeat the exercise for 10 to 15 repetitions.
Tips for Doing Toe Touches With Medicine Ball

Here are some tips to help you get the most out of toe touches with medicine ball:
- Start with a light medicine ball and work your way up to a heavier one as you get stronger.
- Keep your legs straight throughout the exercise.
- Engage your core muscles to help you lift your head and shoulders off the ground.
- Exhale as you lift your head and shoulders off the ground, and inhale as you lower them back down.
- Don't rush the exercise - focus on your form and technique to get the most benefit.
Benefits of Toe Touches With Medicine Ball

Toe touches with medicine ball offer a range of benefits, including:
- Strengthening your core muscles, including your abs, obliques, and lower back.
- Improving your balance and stability.
- Helping to prevent injury by strengthening your core and improving your balance.
- Increasing your overall fitness level by challenging your body in a new way.
Precautions
As with any exercise, it's important to take precautions to prevent injury. Here are some tips to keep in mind:
- Start with a light medicine ball and work your way up to a heavier one as you get stronger.
- If you have any pre-existing medical conditions or injuries, talk to your doctor before attempting this exercise.
- If you experience any pain or discomfort, stop the exercise immediately and consult a medical professional.
- Always warm up before attempting any exercise, and stretch afterward to prevent muscle soreness.
Conclusion
Toe touches with medicine ball is an effective exercise for building core strength and improving balance. By following the proper technique and taking the necessary precautions, you can safely incorporate this exercise into your workout routine for maximum benefit.
Related video ofToe Touches With Medicine Ball
The seated row is an exercise that is commonly performed in the gym to strengthen the back muscles. It is a great exercise for building a strong and healthy back. However, many people are unsure about what muscles are actually worked during the exercise. In this article, we will explore the muscles that are involved in the seated row exercise.
The Back Muscles

The back muscles are made up of several different muscle groups. These include the latissimus dorsi, rhomboids, trapezius, and erector spinae muscles. Each of these muscle groups plays a role in movement and stability of the back.
The Latissimus Dorsi

The latissimus dorsi muscle is the largest muscle in the back. It is responsible for adduction, extension, and internal rotation of the shoulder. During the seated row exercise, the latissimus dorsi muscle is the primary muscle worked.
The Rhomboids

The rhomboids are located in the upper back and are responsible for scapular retraction and elevation. They work in conjunction with the trapezius muscles to stabilize the shoulder blades during the seated row exercise.
The Trapezius Muscles

The trapezius muscles are located in the upper back, neck, and shoulders. They are responsible for scapular adduction, elevation, and upward rotation. They work in conjunction with the rhomboids to stabilize the shoulder blades during the seated row exercise.
The Erector Spinae Muscles
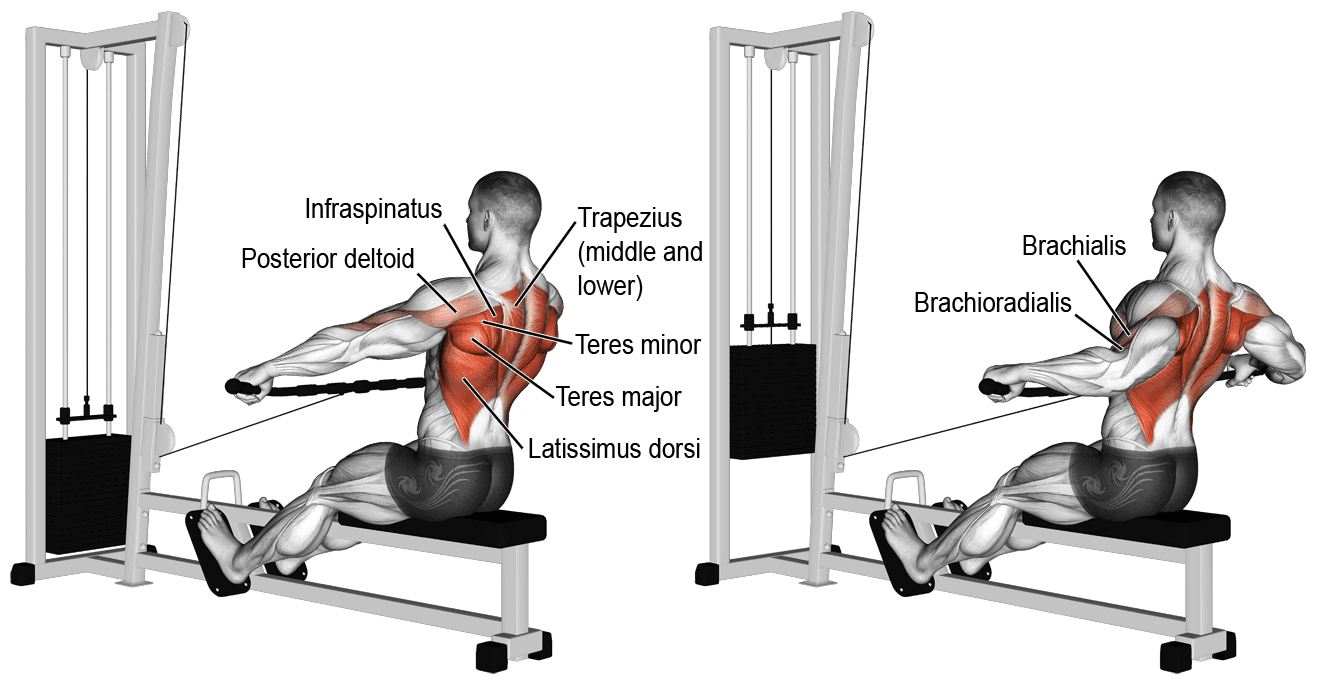
The erector spinae muscles are located in the lower back and are responsible for extension and lateral flexion of the spine. They work to maintain proper posture during the seated row exercise.
Proper Form for the Seated Row Exercise

It is important to perform the seated row exercise with proper form to ensure that the correct muscles are being worked. To perform the exercise, sit on the machine with your feet flat on the floor and grab the handles with an overhand grip. Pull the handles towards your chest while keeping your elbows close to your body. Pause at the top of the movement and slowly release the handles back to the starting position.
Conclusion
The seated row exercise is a great way to strengthen the back muscles. The primary muscle worked during the exercise is the latissimus dorsi, but the rhomboids, trapezius muscles, and erector spinae muscles also play a role in the movement. Performing the exercise with proper form is important to ensure that the correct muscles are being worked.
Related video of What Muscle Does The Seated Row Work
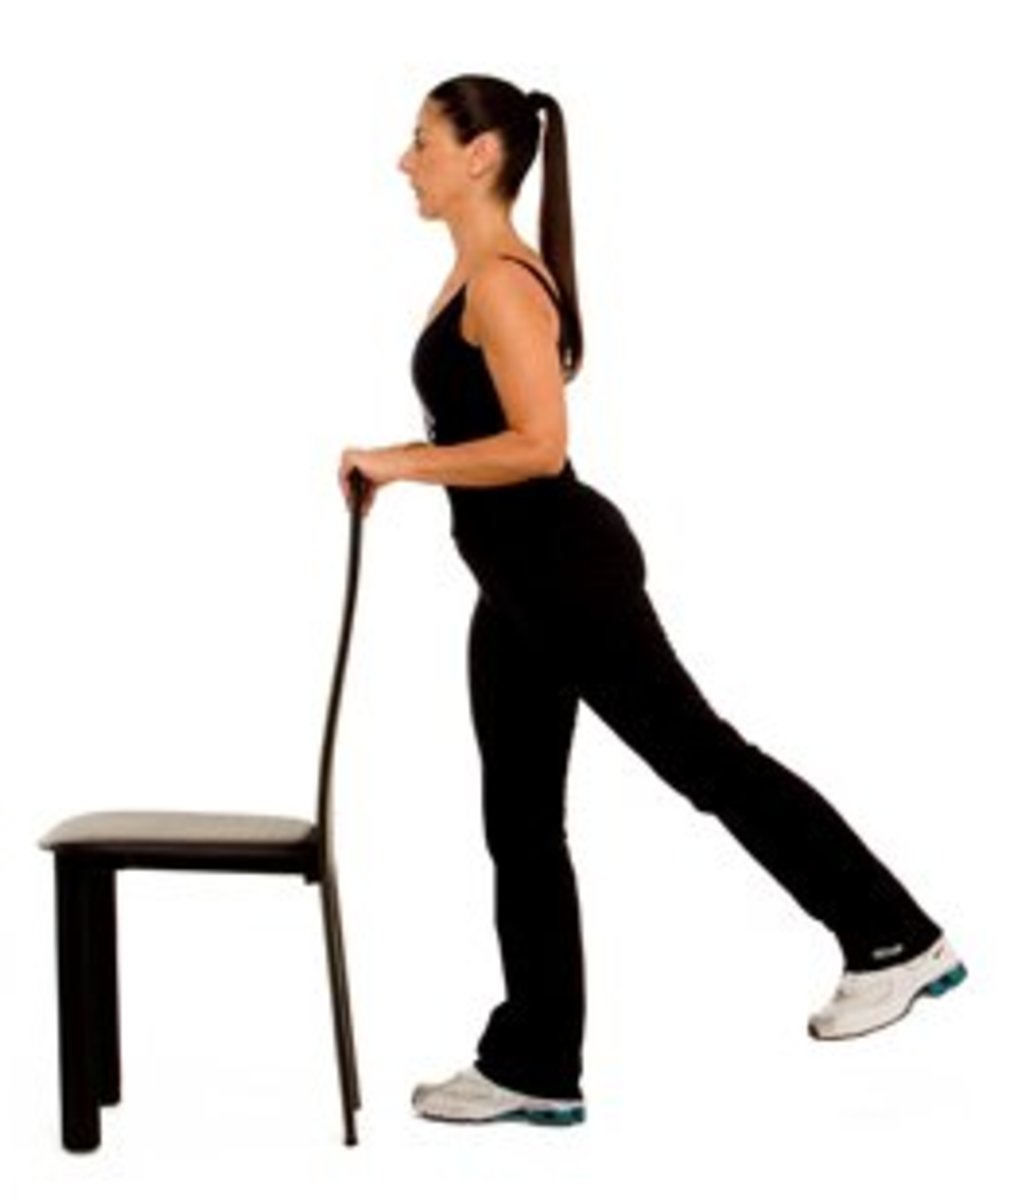
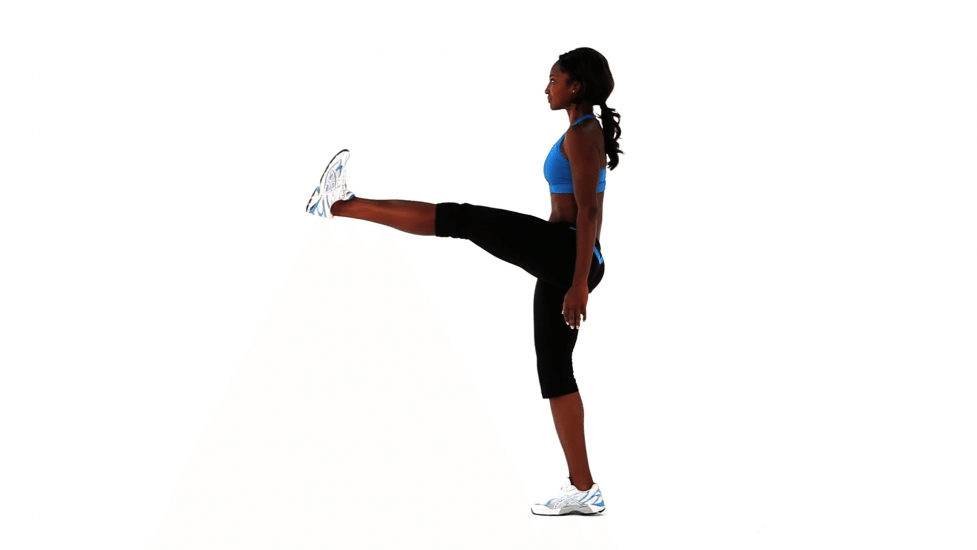
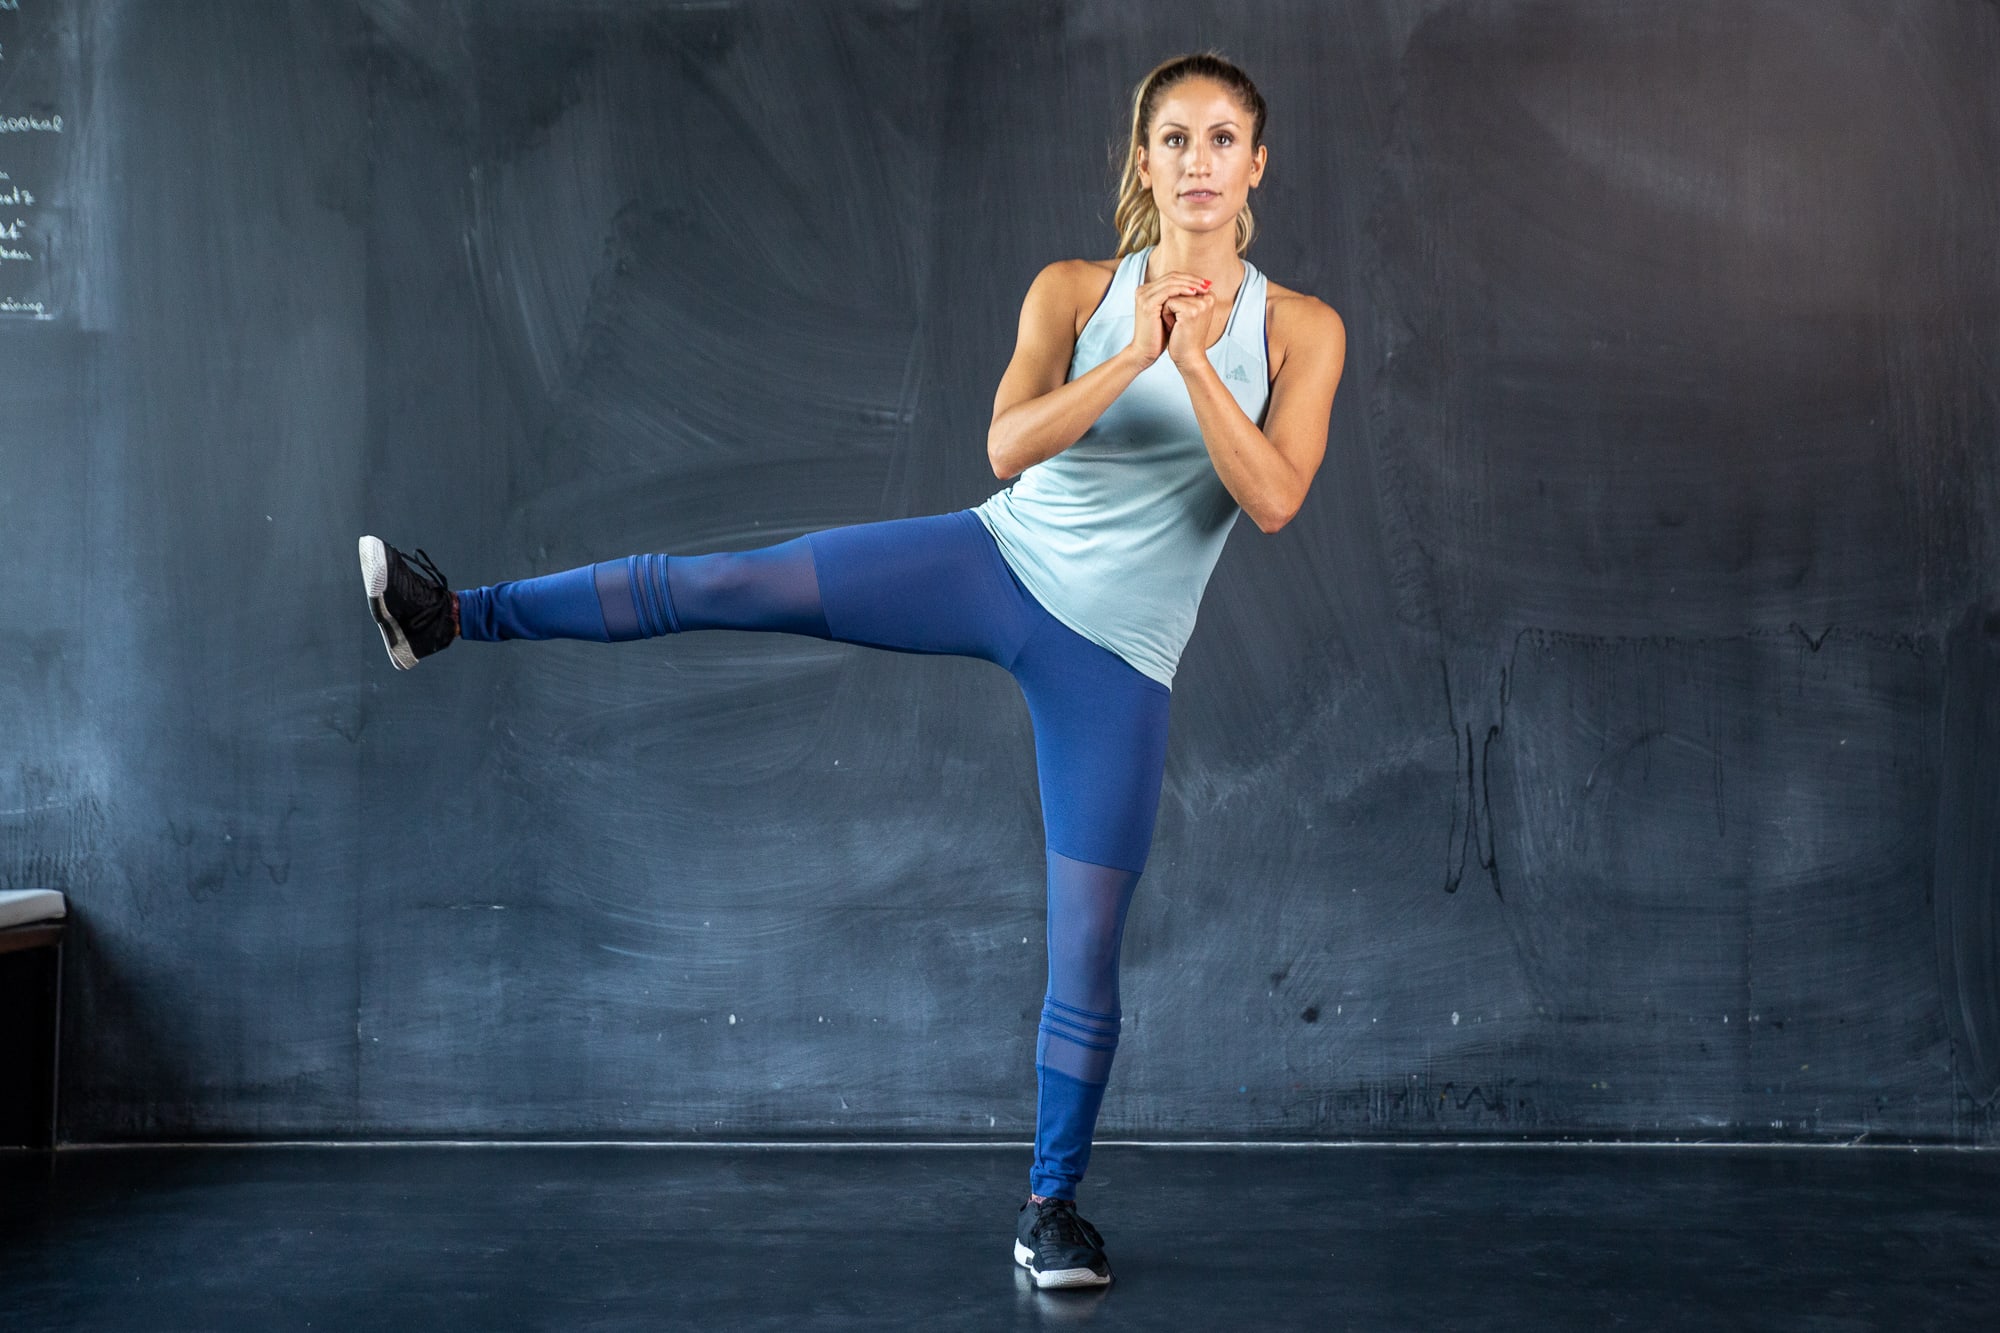
Standing leg lifts are a great way to tone your glutes, hamstrings, and quadriceps. These muscles work together to lift your leg and provide stability while performing the exercise. In this article, we will discuss in detail the muscles used to lift the leg while standing.
Glutes

The glutes, also known as the buttocks, are one of the primary muscles used when lifting your leg while standing. These muscles are composed of three different muscles: the gluteus maximus, gluteus medius, and gluteus minimus. The gluteus maximus is the largest muscle in the body and is responsible for hip extension, which is essential for lifting the leg.
The gluteus medius and minimus are located on the outer surface of the pelvis and are responsible for hip abduction, or moving the leg away from the body. These muscles work together to provide stability and balance while performing the standing leg lift exercise.
Hamstrings
The hamstrings are a group of three muscles located on the back of the thigh. These muscles are responsible for hip extension and knee flexion, which are both essential movements when lifting the leg while standing. The hamstrings work in conjunction with the glutes to provide stability and control during the exercise.
Quadriceps
The quadriceps, also known as the quads, are a group of four muscles located on the front of the thigh. These muscles are responsible for knee extension, which is necessary when lifting the leg while standing. The quads work in conjunction with the hamstrings and glutes to provide stability and control during the exercise.
Adductors

The adductors are a group of muscles located on the inner surface of the thigh. These muscles are responsible for hip adduction, or moving the leg towards the body. The adductors work in conjunction with the glutes to provide stability and control during the standing leg lift exercise.
Core Muscles
The core muscles, including the abdominals and lower back muscles, are also essential when performing the standing leg lift exercise. These muscles provide stability and control while lifting the leg and maintaining balance. A strong core is necessary for proper form and to prevent injury while performing the exercise.
Conclusion
The standing leg lift exercise is a great way to tone and strengthen the muscles in your lower body. The glutes, hamstrings, quadriceps, adductors, and core muscles all work together to provide stability and control during the exercise. Incorporating this exercise into your fitness routine can help improve your balance, coordination, and overall lower body strength.
Related video of Muscles Used To Lift Leg While Standing

Kettlebells are one of the most versatile pieces of equipment you can use in your workouts. They are great for building strength, increasing endurance, and improving cardiovascular health. One exercise that is often overlooked is the kettlebell around the head. This exercise is a great way to work your shoulders, upper back, and core. In this article, we will show you how to do the kettlebell around the head and why it is such a valuable addition to your workout routine.
What Is The Kettlebell Around The Head Exercise?

The kettlebell around the head exercise involves holding a kettlebell with both hands and moving it in a circular motion around your head. This exercise is usually performed standing up, but it can also be done sitting down. The kettlebell around the head works your shoulders, upper back, and core muscles. It is a great exercise to add to your routine if you want to improve your posture, increase your shoulder stability, and build upper body strength.
How To Do The Kettlebell Around The Head Exercise
To perform the kettlebell around the head exercise, follow these steps:
- Hold a kettlebell with both hands and stand with your feet shoulder-width apart.
- Bring the kettlebell up to your chest and hold it close to your body.
- Extend your arms up and overhead while keeping your core tight and your back straight.
- Slowly move the kettlebell in a circular motion around your head.
- As you bring the kettlebell around to the back of your head, keep your elbows close to your body.
- Continue the circular motion, bringing the kettlebell back to the starting position.
- Repeat the exercise for the desired number of reps.

When performing the kettlebell around the head exercise, it is important to maintain good form. Keep your core tight and your back straight throughout the exercise. Make sure that your elbows are close to your body as you bring the kettlebell around to the back of your head. This will help to prevent any strain on your neck and shoulders.
Benefits Of The Kettlebell Around The Head Exercise

The kettlebell around the head exercise has several benefits, including:
- Increased shoulder stability
- Improved posture
- Increased strength in the upper body
- Improved core strength
- Enhanced mobility in the shoulders and upper back
- Improved cardiovascular health
By incorporating the kettlebell around the head exercise into your workout routine, you can improve your overall fitness and well-being.
Variations Of The Kettlebell Around The Head Exercise

There are several variations of the kettlebell around the head exercise that you can try to increase the challenge or target different muscle groups:
- Kneeling kettlebell around the head
- Single-arm kettlebell around the head
- Kettlebell figure eights
- Kettlebell halos
By incorporating these variations into your workout routine, you can keep the exercise challenging and target different muscle groups for a more complete workout.
Conclusion
The kettlebell around the head exercise is a great way to work your shoulders, upper back, and core muscles. It is a versatile exercise that can be done standing up or sitting down and can be modified to increase the challenge or target different muscle groups. By incorporating this exercise into your workout routine, you can improve your posture, increase your shoulder stability, and build upper body strength.
Related video of Kettlebell Around The Head: A Complete Guide

Introduction
If you are looking to build a strong back and improve your overall upper body strength, then you must include lat pulldowns in your workout routine. But, did you know that there are two types of lat pulldowns - reverse grip and regular grip? In this article, we will discuss the differences between the two and which one is better for you.What is Lat Pulldown?
Lat pulldown is a popular exercise that targets the latissimus dorsi muscle, which is the largest muscle in your back. It involves pulling a weighted bar down towards your chest while sitting on a lat pulldown machine. This exercise helps to build upper back and shoulder strength, improve posture, and increase range of motion in your shoulders.
What is Reverse Grip Lat Pulldown?
Reverse grip lat pulldown is a variation of lat pulldown where you grip the bar with your palms facing towards you instead of away from you. This grip targets the biceps and the brachialis muscles in addition to the lats. This exercise is especially beneficial for people who have weaker biceps and want to strengthen them.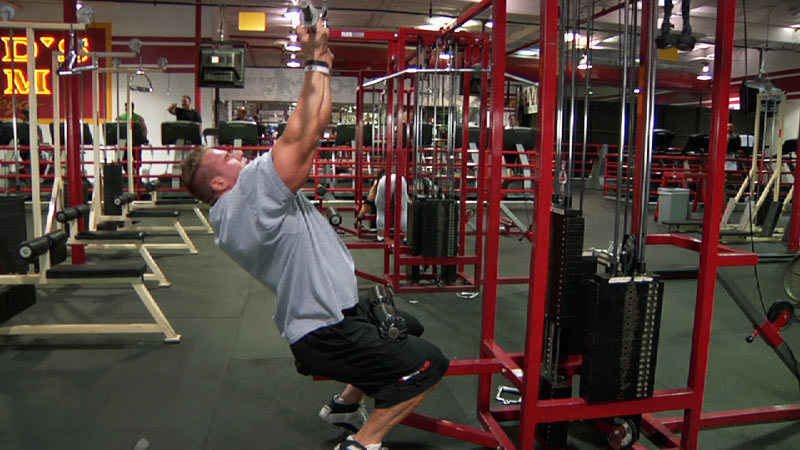
What is Regular Grip Lat Pulldown?
Regular grip lat pulldown is the traditional form of lat pulldown where you grip the bar with your palms facing away from you. This grip targets the lats, shoulders, and upper back muscles. It is a great exercise to build upper body strength and improve posture.
Differences between Reverse Grip and Regular Grip Lat Pulldown
The main difference between reverse grip and regular grip lat pulldown is the grip. Reverse grip lat pulldown targets the biceps and brachialis muscles in addition to the lats, while regular grip lat pulldown primarily targets the lats and upper back muscles. Reverse grip lat pulldown also involves more elbow flexion than regular grip lat pulldown, which means that it puts more stress on the biceps and brachialis muscles. This makes it a better exercise for people who have weaker biceps.Which One is Better?
Both reverse grip and regular grip lat pulldowns have their own benefits and are effective in building upper body strength. The choice between the two depends on your fitness goals and the specific muscles you want to target.If you want to focus on building your lats and upper back muscles, then regular grip lat pulldown is the way to go. On the other hand, if you want to strengthen your biceps in addition to your lats, then reverse grip lat pulldown is the better option.How to Do Lat Pulldowns
1. Sit on the lat pulldown machine with your feet flat on the ground and your knees bent.2. Grab the bar with your hands shoulder-width apart, palms facing away from you (regular grip) or towards you (reverse grip).3. Pull the bar down towards your chest while keeping your back straight and your elbows close to your body.4. Slowly release the bar back to the starting position.5. Repeat for the desired number of reps.Tips for Doing Lat Pulldowns
- Make sure to keep your back straight throughout the exercise.- Do not use momentum to pull the bar down. Use a slow and controlled motion.- Focus on squeezing your shoulder blades together at the bottom of the movement.- Use a weight that allows you to perform the exercise with proper form.Conclusion
Whether you choose reverse grip or regular grip lat pulldowns, incorporating this exercise into your workout routine can help you build a strong and healthy back. Remember to use proper form and start with a weight that allows you to perform the exercise with control. With consistency and dedication, you will see improvements in your upper body strength and posture.Related video of Reverse Grip Lat Pulldown Vs Lat Pulldown

The overhead farmers walk is a popular exercise that involves carrying weights overhead while walking. This exercise is great for building strength, endurance, and stability, and it is commonly used by athletes, powerlifters, and bodybuilders. In this article, we will discuss the muscles worked during the overhead farmers walk and why this exercise is so effective.
What is the Overhead Farmers Walk?
The overhead farmers walk is a variation of the traditional farmers walk exercise. Instead of carrying weights at your sides, you carry them overhead. To perform the overhead farmers walk, you will need a pair of dumbbells or kettlebells. Pick up the weights and press them overhead, locking out your arms. Begin walking and keep the weights overhead for the entire duration of the exercise.

Muscles Worked During the Overhead Farmers Walk
The overhead farmers walk is a full-body exercise that engages multiple muscle groups. The primary muscles worked during this exercise are the shoulders, triceps, upper back, and core. However, other muscles are also activated, including the forearms, glutes, and legs.
Shoulders
The shoulders are the primary muscle group worked during the overhead farmers walk. When you carry the weights overhead, your shoulders must work hard to stabilize the weight and control the movement. This exercise targets the deltoids and can help to build strength and size in this muscle group.

Triceps
The triceps are also heavily involved in the overhead farmers walk. When you press the weights overhead, your triceps must work hard to extend your arms and lock out the weight. This exercise can help to build strength and size in the triceps.

Upper Back
The upper back muscles, including the traps and rhomboids, are activated during the overhead farmers walk. These muscles work to stabilize the weight and prevent it from falling forward. This exercise can help to build strength and size in the upper back.

Core
The core muscles, including the abs and obliques, are also heavily involved in the overhead farmers walk. These muscles work to stabilize your spine and keep your body upright while you carry the weights overhead. This exercise can help to build core strength and stability.

Forearms
The forearms are used to grip and hold onto the weights during the overhead farmers walk. This exercise can help to build grip strength and forearm size.
Glutes and Legs
The glutes and legs are also activated during the overhead farmers walk. These muscles work to stabilize your body and propel you forward while you walk. This exercise can help to build leg and glute strength and endurance.

Why is the Overhead Farmers Walk So Effective?
The overhead farmers walk is an effective exercise for several reasons. First, it is a full-body exercise that engages multiple muscle groups. This makes it a time-efficient way to build strength and endurance. Second, the exercise is functional, meaning that it mimics movements that you may encounter in daily life or sports. Finally, the overhead farmers walk is a great way to challenge your stability and balance, which can improve your overall athleticism.
Conclusion
The overhead farmers walk is a great exercise for building strength, endurance, and stability. It engages multiple muscle groups, including the shoulders, triceps, upper back, core, forearms, glutes, and legs. By incorporating this exercise into your workout routine, you can build functional strength and improve your overall athleticism.