
When it comes to getting toned abs, crunches are considered to be one of the most effective exercises. However, if you're looking for a more challenging variation of the traditional crunch, try knee to elbow crunches.
What are Knee To Elbow Crunches?

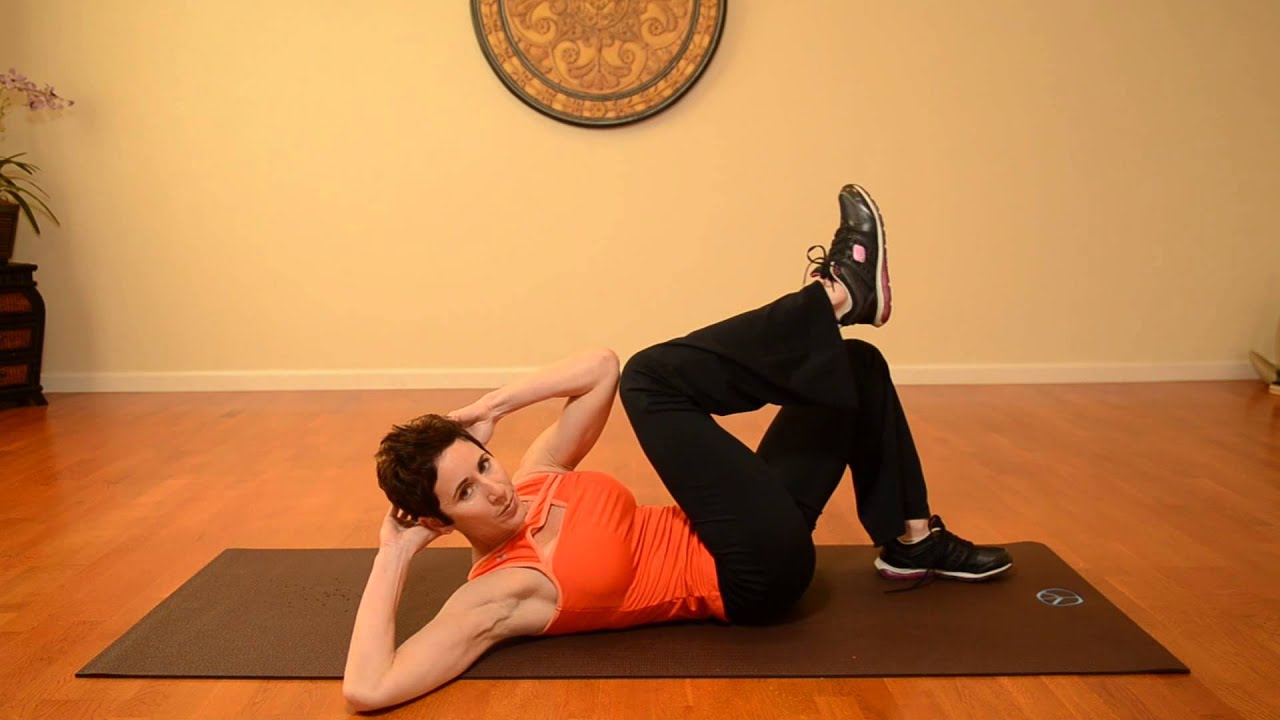
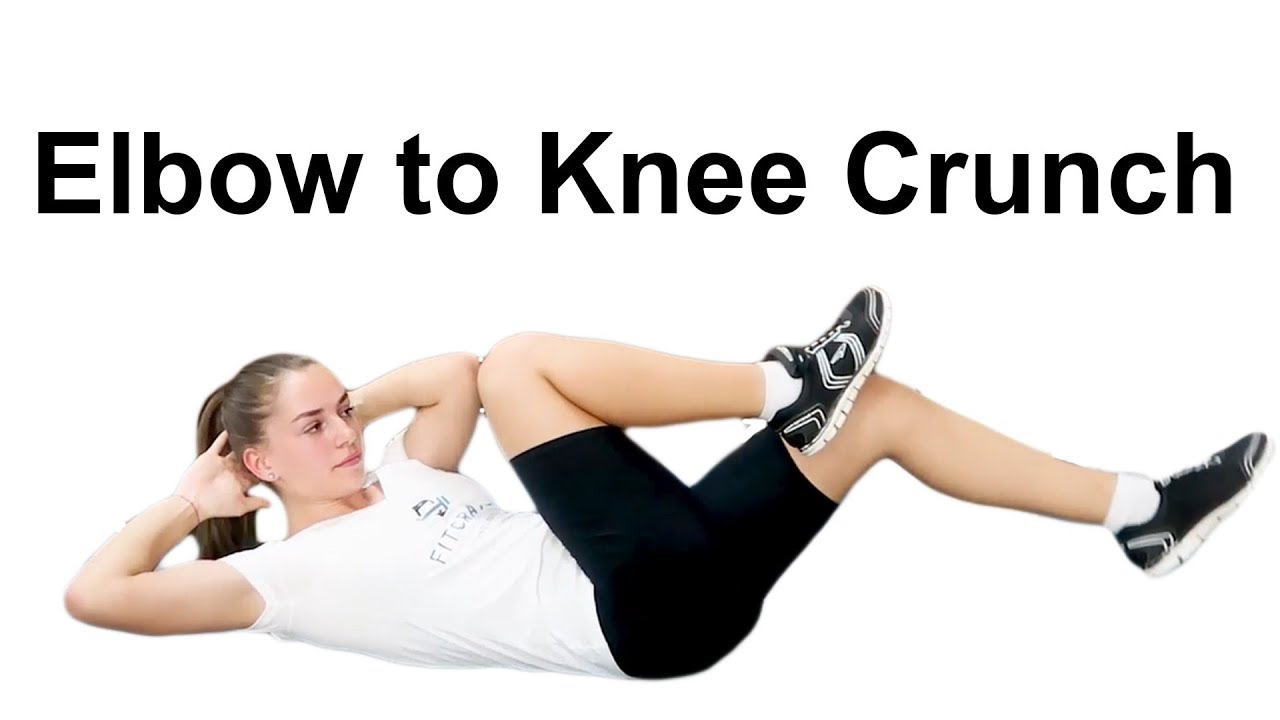
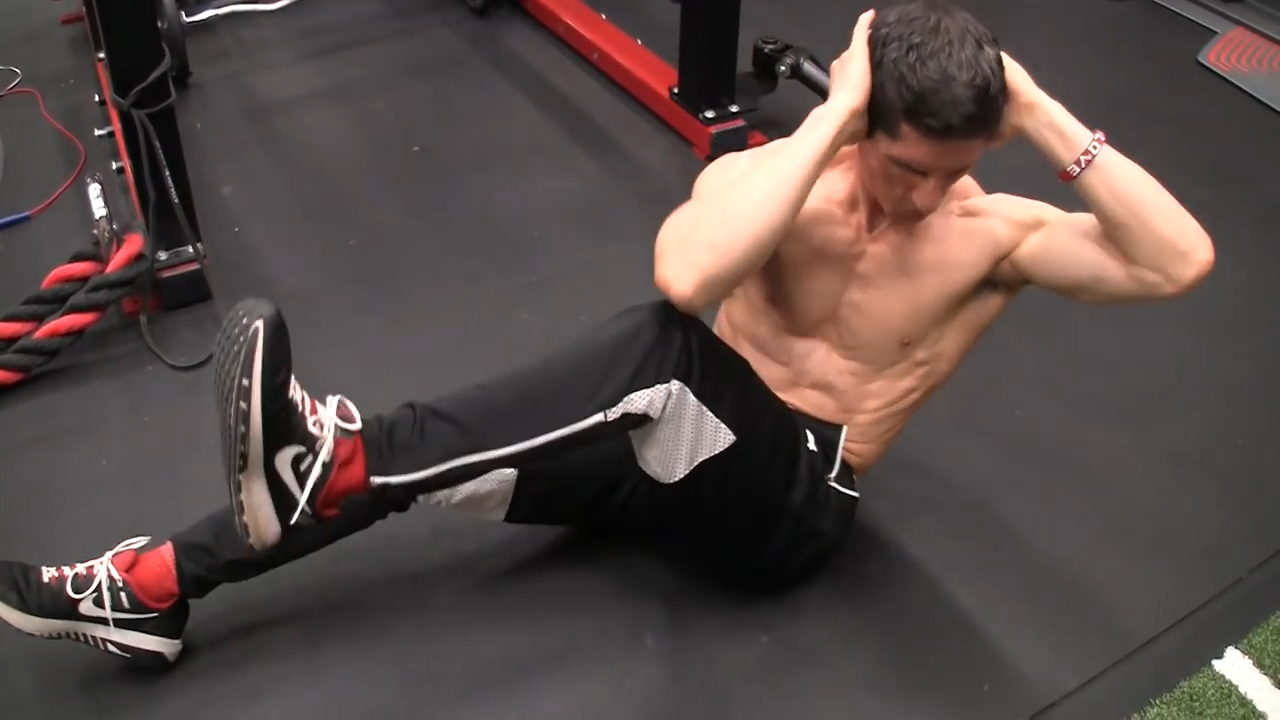
Knee to elbow crunches are a variation of the traditional crunch that targets the upper and lower abs, as well as the obliques. To perform this exercise, start by lying on your back with your knees bent and your feet flat on the floor. Place your hands behind your head and lift your head, neck, and shoulders off the ground.
Next, bring your right elbow towards your left knee while simultaneously straightening your right leg. Return to the starting position and repeat on the other side. This completes one rep.
The Benefits of Knee To Elbow Crunches
Knee to elbow crunches offer a variety of benefits, including:
- Targeting the upper and lower abs, as well as the obliques
- Strengthening the core muscles
- Improving posture
- Burning calories and aiding in weight loss
- Increasing flexibility
Tips for Performing Knee To Elbow Crunches
If you're new to knee to elbow crunches, start with a few reps and gradually increase the number as you get stronger. Here are some additional tips to keep in mind:
- Keep your neck and shoulders relaxed throughout the exercise
- Engage your core muscles throughout the movement
- Breathe deeply and exhale as you bring your elbow towards your knee
- Avoid pulling on your neck with your hands
- Focus on quality over quantity, making sure to perform each rep with proper form
Variations of Knee To Elbow Crunches

If you're looking to switch up your workout routine, there are several variations of knee to elbow crunches you can try:
- Reverse knee to elbow crunches: Instead of bringing your right elbow towards your left knee, bring your left elbow towards your right knee.
- Single leg knee to elbow crunches: Instead of straightening your leg, keep it bent and perform the movement with one leg at a time.
- Weighted knee to elbow crunches: Hold a dumbbell or medicine ball in your hands while performing the exercise for added resistance.
Conclusion
Knee to elbow crunches are a challenging and effective exercise for toning your abs and strengthening your core muscles. By incorporating this exercise into your workout routine and following the tips and variations above, you can achieve a stronger, leaner, and more defined midsection.
Related video of Knee To Elbow Crunches: The Perfect Exercise for Toned Abs

The seated shoulder barbell press is a compound exercise that targets the shoulders, triceps, and upper back. It involves pressing a barbell from shoulder level to overhead while seated on a bench. This exercise is great for building overall upper body strength and can help improve posture.
How to Perform a Seated Shoulder Barbell Press
To perform a seated shoulder barbell press, follow these steps:
- Sit on a bench with your feet flat on the floor and your back straight.
- Hold a barbell with an overhand grip at shoulder level.
- Press the barbell upward until your arms are fully extended overhead.
- Slowly lower the barbell back down to shoulder level.
- Repeat for the desired number of reps.

It's important to use proper form when performing the seated shoulder barbell press to avoid injury and get the most benefit from the exercise. Keep your elbows close to your body and your wrists straight throughout the movement. Exhale as you press the barbell up and inhale as you lower it back down.
Variations of the Seated Shoulder Barbell Press
There are several variations of the seated shoulder barbell press that can help target different areas of the shoulders and upper body:
- Wide grip: Hold the barbell with a wider than shoulder-width grip to target the outer shoulders.
- Narrow grip: Hold the barbell with a narrower than shoulder-width grip to target the triceps.
- Behind the neck: Press the barbell behind your neck instead of in front to target the rear shoulders.
- Single arm: Press a dumbbell overhead with one arm at a time to work on balance and stability.

Benefits of the Seated Shoulder Barbell Press
The seated shoulder barbell press offers several benefits, including:
- Building overall upper body strength
- Improving posture by strengthening the upper back muscles
- Toning and shaping the shoulders
- Increasing shoulder stability and mobility
- Improving athletic performance in sports that involve overhead movements
Precautions and Tips
Before performing the seated shoulder barbell press, it's important to warm up properly and start with a light weight to avoid injury. If you have any shoulder or neck issues, it's best to consult with a doctor or physical therapist before attempting this exercise.
Here are some tips to keep in mind when performing the seated shoulder barbell press:
- Keep your core engaged and your back straight throughout the movement.
- Avoid arching your back or leaning forward as you press the barbell overhead.
- Use a weight that allows you to perform the exercise with proper form and without straining.
- Don't lock out your elbows at the top of the movement to avoid unnecessary stress on the joints.
Incorporating the Seated Shoulder Barbell Press into Your Workout
The seated shoulder barbell press can be incorporated into your upper body workout routine as a primary or accessory exercise. It's best to perform this exercise after warming up and targeting larger muscle groups like the chest and back.
Here's an example of how to incorporate the seated shoulder barbell press into a workout:
- Bench press: 3 sets of 8 reps
- Pull-ups: 3 sets of 10 reps
- Seated shoulder barbell press: 3 sets of 12 reps
- Tricep pushdowns: 3 sets of 10 reps
Conclusion
The seated shoulder barbell press is a great exercise for building overall upper body strength, improving posture, and toning the shoulders. By using proper form and incorporating variations into your workout, you can target different areas of the shoulders and upper body. Remember to warm up properly and consult with a doctor or physical therapist if you have any shoulder or neck issues.
Related video of Seated Shoulder Barbell Press: How to Perform and Benefits
Squatting is a fundamental exercise that targets multiple muscle groups, including the quadriceps, hamstrings, glutes, and core. Adding a dumbbell to this exercise can increase the intensity, challenge your muscles, and help you achieve your fitness goals faster. In this article, we'll explain how to perform squats with a dumbbell, its benefits, and some tips to avoid injuries.
How To Perform Squats With A Dumbbell
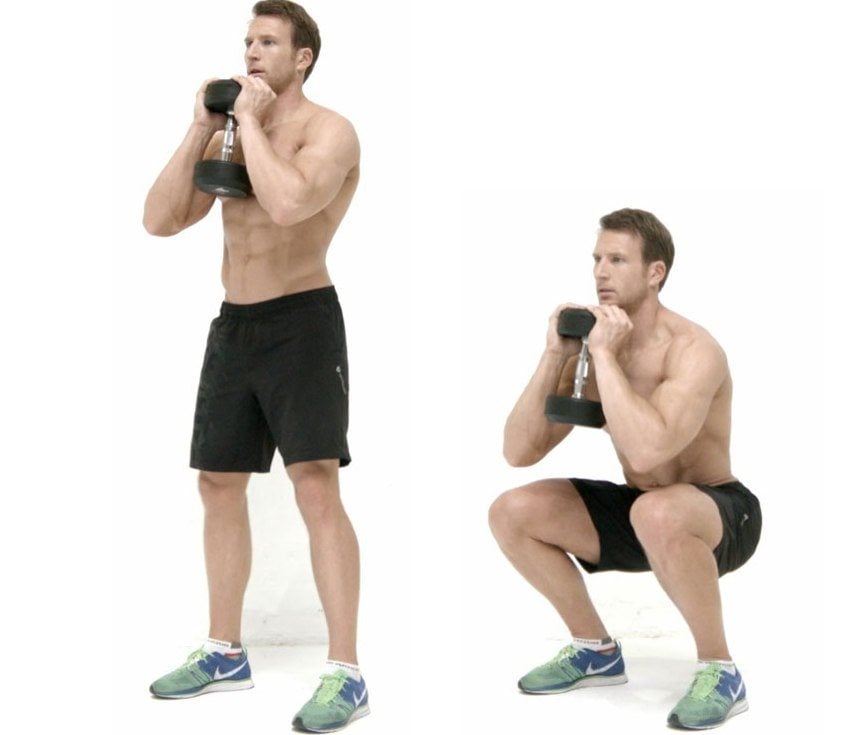
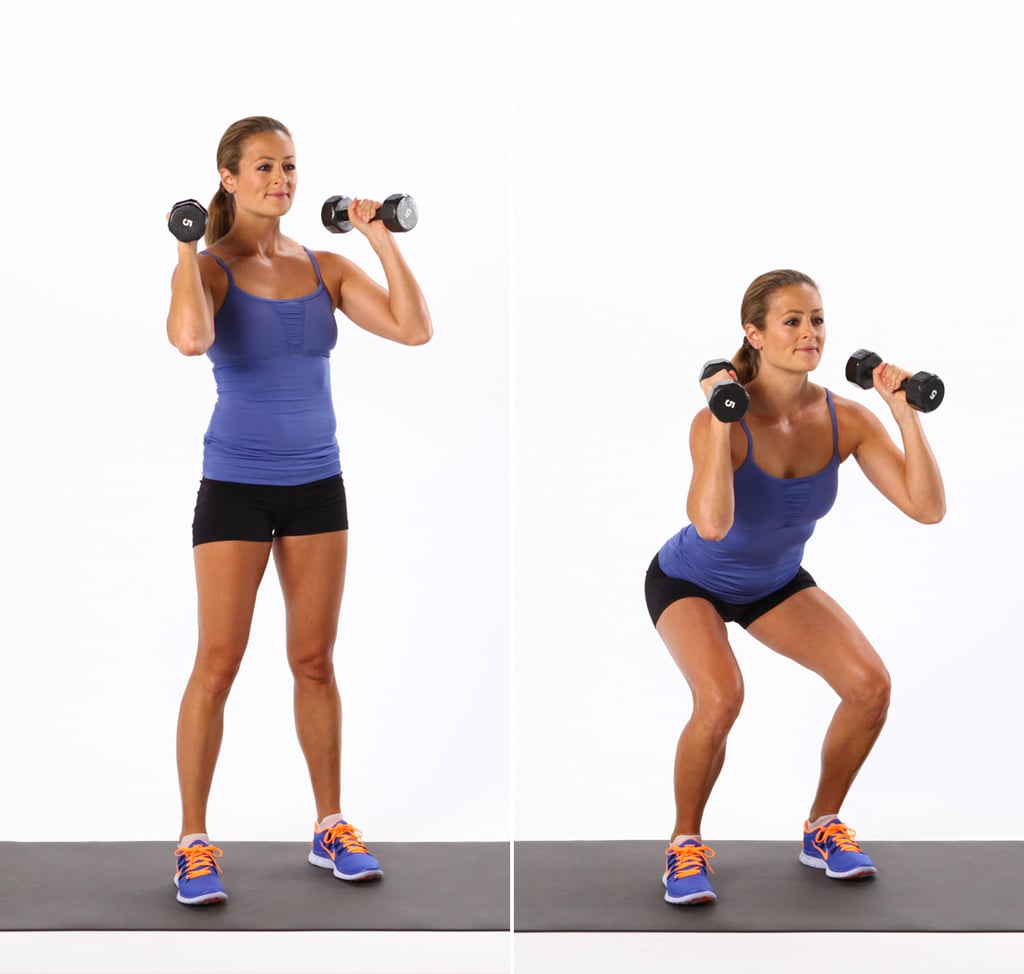
Start by standing with your feet shoulder-width apart and holding a dumbbell with both hands in front of your chest. Keep your chest up, shoulders back, and core engaged. This is your starting position.
Next, lower your body by bending your knees and pushing your hips back. Keep your weight on your heels and your knees behind your toes. Lower your body until your thighs are parallel to the ground or lower, depending on your flexibility.
Pause for a second at the bottom of the squat, then push through your heels and extend your legs to return to the starting position. Exhale as you push up.
Repeat for 10-15 reps, depending on your fitness level and goals. Rest for 30-60 seconds, then do another set.
Benefits Of Squatting With A Dumbbell
Squatting with a dumbbell can provide several benefits, such as:
- Increased muscle activation: Adding a dumbbell to your squats can increase the activation of your leg muscles, especially the glutes and hamstrings.
- Better balance and stability: Holding a dumbbell in front of your chest can improve your balance and stability during the squat, reducing the risk of falls or injuries.
- Increased calorie burn: Squatting with a dumbbell can increase the intensity of the exercise, leading to more calories burned and faster weight loss.
- Improved functional strength: Squatting is a functional movement that mimics everyday activities, such as sitting and standing. Adding a dumbbell can increase your functional strength and make these activities easier.
Tips For Safe Squatting With A Dumbbell

While squatting with a dumbbell can be safe and effective, it's important to follow some tips to avoid injuries:
- Choose the right weight: Use a weight that challenges your muscles but allows you to maintain proper form. If you can't perform the squat with good form, reduce the weight.
- Warm up before squatting: Do some dynamic stretches or light cardio to warm up your muscles and prepare your body for the exercise.
- Keep your core engaged: Engage your core muscles throughout the squat to protect your lower back and maintain proper posture.
- Don't let your knees cave in: Keep your knees in line with your toes and avoid letting them cave inwards, as this can put stress on your knees and ankles.
- Breathe properly: Inhale as you lower your body and exhale as you push up. Don't hold your breath during the exercise.
Conclusion
Squatting with a dumbbell can be a challenging and effective exercise that targets multiple muscle groups and provides several benefits. Make sure to follow the proper form, choose the right weight, warm up before squatting, engage your core, and breathe properly. With consistent practice and proper technique, you can achieve your fitness goals and improve your overall health.
Related video of Squatting With A Dumbbell

If you're looking for a way to build your chest muscles, the flat bench smith machine press is an excellent exercise to consider. This exercise involves pressing a barbell while lying on a flat bench that is attached to a smith machine. This article will explore the benefits of the flat bench smith machine press and provide a step-by-step guide on how to perform it correctly.
Benefits of the Flat Bench Smith Machine Press

One of the biggest benefits of the flat bench smith machine press is that it allows you to lift heavier weights than you might be able to with other chest exercises. This is because the smith machine provides a stable and guided path for the barbell, which reduces the risk of injury and allows you to focus on your form and technique.
Another benefit of the flat bench smith machine press is that it works not only your chest muscles but also your triceps and shoulders. This makes it a great compound exercise that can help you build overall upper body strength and definition.
Finally, the flat bench smith machine press allows you to adjust the height of the barbell to target different areas of your chest. For example, if you set the barbell lower, you can target your lower chest muscles, while setting it higher will target your upper chest muscles.
How to Perform the Flat Bench Smith Machine Press

Here's a step-by-step guide on how to perform the flat bench smith machine press:
- Adjust the height of the barbell on the smith machine so that it's at chest level when you're lying on the flat bench.
- Lie down on the bench with your feet flat on the floor and your eyes directly under the barbell.
- Grip the barbell with a shoulder-width grip and lift it off the rack, holding it directly above your chest with your arms straight.
- Lower the barbell down to your chest, keeping your elbows tucked in and your wrists straight.
- Press the barbell back up to the starting position, extending your arms fully.
- Repeat for your desired number of reps.
Remember to keep your back flat on the bench and your core engaged throughout the exercise. You should also breathe in as you lower the barbell down to your chest and breathe out as you press it back up.
Tips for a Better Flat Bench Smith Machine Press

Here are a few tips to help you get the most out of your flat bench smith machine press:
- Start with a light weight to warm up and practice your form and technique.
- Focus on keeping your elbows tucked in and your wrists straight to prevent injury and maximize your chest activation.
- Use a spotter or safety bars to prevent accidents and allow you to lift heavier weights with confidence.
- Vary the height of the barbell to target different areas of your chest and prevent plateaus.
- Incorporate other chest exercises into your workout routine to prevent muscle imbalances and promote overall strength and definition.
Conclusion

The flat bench smith machine press is an excellent exercise for building your chest muscles, as well as your triceps and shoulders. By following the tips and techniques outlined in this article, you can perform this exercise safely and effectively, and achieve your fitness goals. So, why not give it a try and see the results for yourself?
Related video of Flat Bench Smith Machine Press: Benefits and How-To

Have you ever noticed a dip or curve on the side of your hips that makes your body appear less curvaceous? These dips are known as hip dips, and while they are a natural part of your body’s anatomy, they can make you feel self-conscious. However, there is a solution- an effective hip dips ab workout. In this article, we will guide you through the best exercises to target and strengthen your hips and glutes.
What are Hip Dips?

Hip dips are indentations that appear on the side of the hips, between the hip bone and the thigh bone. They are caused by the shape of your pelvis and the distribution of fat in your body. While hip dips are a natural part of your body, they can make you feel less confident in your appearance. However, with the right exercises, you can minimize their appearance and feel more confident in your skin.
Why Target Hips and Glutes?

Targeting your hips and glutes is an effective way to minimize the appearance of hip dips. Strengthening these muscles will help to shape and lift your buttocks, giving you a fuller and curvier figure. Additionally, strong hips and glutes can improve your posture, increase your flexibility, and reduce your risk of injury during physical activity.
Exercises to Target Hips and Glutes
Here are some of the best exercises to target your hips and glutes:
1. Squats

Squats are a classic exercise that target the hips, glutes, and thighs. To perform a squat, stand with your feet shoulder-width apart and your toes facing forward. Lower your body as if you were sitting in a chair, keeping your knees over your toes. Return to a standing position and repeat.
2. Lunges
Lunges are another effective exercise for targeting the hips, glutes, and thighs. To perform a lunge, step forward with one foot and lower your body until your front knee is bent at a 90-degree angle. Return to a standing position and repeat with the other leg.
3. Glute Bridge

The glute bridge targets the glutes and lower back. To perform a glute bridge, lie on your back with your knees bent and your feet flat on the ground. Lift your hips up towards the ceiling, squeezing your glutes at the top of the movement. Lower your hips back down and repeat.
4. Side Leg Raises

Side leg raises target the hips and outer thighs. To perform a side leg raise, lie on your side with your legs straight. Lift your top leg up towards the ceiling, keeping your foot flexed. Lower your leg back down and repeat on the other side.
How Often Should You Do These Exercises?
To see results, it is recommended that you perform these exercises at least 2-3 times per week. Start with 2-3 sets of 10-12 repetitions for each exercise, gradually increasing the number of sets and repetitions as you get stronger.
Conclusion
Having hip dips is a natural part of your body, but it does not have to limit your confidence. By targeting your hips and glutes with these exercises, you can minimize the appearance of hip dips and feel more confident in your skin. Remember to start slowly, gradually increasing the intensity and frequency of your workouts as you get stronger.
Related video of Hip Dips Ab Workout: A Guide to Strengthening Your Hips and Glutes

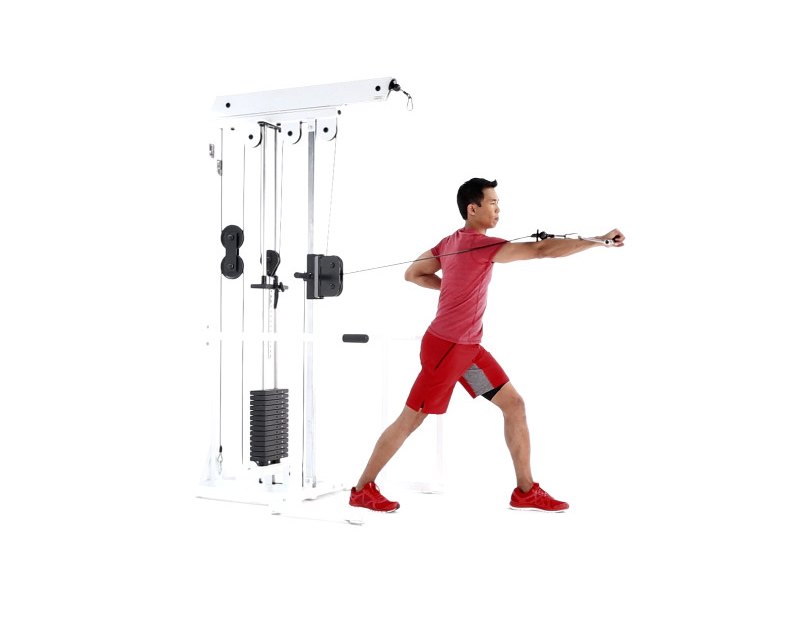
The one arm cable press is a popular exercise used to build strength and muscle in the upper body. This exercise targets the chest, shoulders, and triceps, making it an effective way to improve your overall upper body strength. If you are looking to add more variety to your workout routine or want to challenge yourself with a new exercise, the one arm cable press may be just what you need.
How to Perform the One Arm Cable Press

To perform the one arm cable press, follow these steps:
- Start by standing facing the cable machine, with the pulley set at the highest position.
- Attach a single handle to the cable and grasp it with one hand.
- Position your feet shoulder-width apart and brace your core.
- Press the handle away from your body, keeping your elbow close to your side.
- Extend your arm fully, then return to the starting position.
- Repeat for the desired number of reps, then switch sides and perform the exercise with your other arm.
It is important to maintain proper form throughout the exercise. Keep your elbows close to your sides and avoid locking out your elbow at the top of the movement. Additionally, be sure to breathe normally and maintain control of the cable throughout the exercise.
Variations of the One Arm Cable Press

There are several variations of the one arm cable press that can help you target different areas of your upper body. Some of these variations include:
- One arm cable chest press: This variation focuses primarily on the chest muscles.
- One arm cable shoulder press: This variation targets the shoulders and upper back.
- One arm cable tricep press: This variation isolates the triceps and helps build upper arm strength.
By incorporating these variations into your workout routine, you can create a more well-rounded upper body workout that targets all of the major muscle groups.
Tips for Getting the Most Out of the One Arm Cable Press
To get the most out of the one arm cable press, follow these tips:
- Start with a weight that is challenging but manageable, and gradually increase the weight as you become stronger.
- Focus on maintaining proper form throughout the exercise.
- Perform the exercise slowly and with control, rather than rushing through the movement.
- Incorporate the one arm cable press into your regular upper body workout routine for best results.
By following these tips, you can ensure that you are getting the most out of this exercise and maximizing your upper body strength gains.
Conclusion
The one arm cable press is a highly effective exercise for building upper body strength and muscle. By incorporating this exercise into your regular workout routine and following proper form and technique, you can achieve significant gains in chest, shoulder, and tricep strength. With variations and tips to customize the exercise to your needs, the one arm cable press is a versatile addition to any upper body workout routine.
Related video of One Arm Cable Press: A Comprehensive Guide to Building a Strong Upper Body

Push ups are one of the most basic and effective exercises for building upper body strength. However, the one arm push up is a more advanced variation that requires an immense amount of strength and control. If you're looking to add this impressive move to your fitness routine, read on for a step-by-step progression guide.
Step 1: Build Your Foundation

Before attempting the one arm push up, it's important to have a strong foundation of basic push ups. Start with traditional push ups and work on increasing your reps and perfecting your form. Once you can comfortably perform 20-30 push ups in a set, you're ready to move on to the next step.
Step 2: Master the One Arm Plank
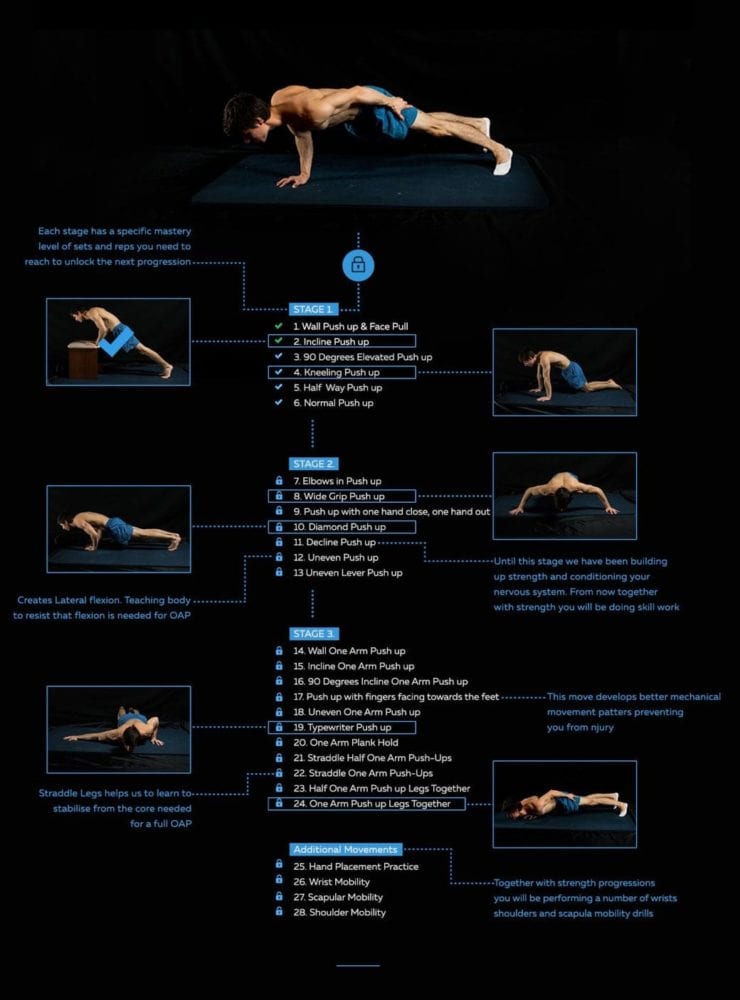
The one arm plank is a great exercise for building the core and upper body strength needed for the one arm push up. Begin in a traditional plank position, then shift your weight to one arm while keeping your body straight and stable. Hold for 10-15 seconds, then switch to the other arm. Repeat for 3-5 sets.
Step 3: Practice Half One Arm Push Ups

Start in a traditional push up position, then shift your weight to one arm while lowering your body halfway down. Push back up to the starting position and repeat on the other arm. Aim for 3-5 sets of 5-10 reps on each arm.
Step 4: Work on Full One Arm Push Ups

Once you've mastered the half one arm push up, it's time to work on the full version. Begin in a traditional push up position, then shift your weight to one arm while lowering your body all the way down. Push back up to the starting position and repeat on the other arm. Start with 3-5 sets of 1-2 reps on each arm, then gradually increase as you get stronger.
Step 5: Add Variations

Once you've mastered the basic one arm push up, there are plenty of variations you can add to keep challenging yourself. Try adding a clap between reps, or performing the push up on an unstable surface like a medicine ball or balance board.
Conclusion
The one arm push up is a challenging but rewarding exercise that can take your upper body strength to the next level. With patience and persistence, anyone can work their way up to this impressive move. Remember to always focus on proper form and gradually increase your reps and sets as you get stronger.
Related video of One Arm Push Up Progression
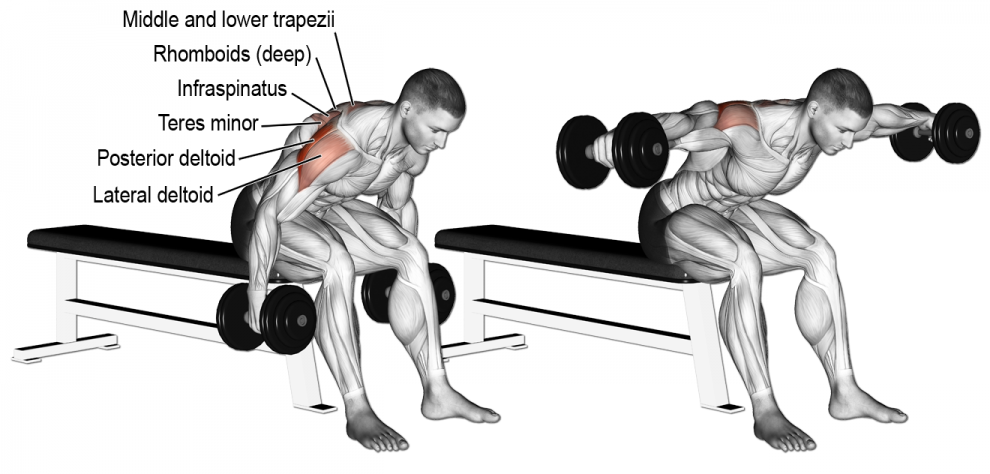
When it comes to building a chiseled physique, an effective shoulder workout is a must. And one of the best exercises for targeting the lateral deltoids is the seated bent over lateral raise. This exercise not only helps to sculpt the shoulders, but it also strengthens the upper back and improves posture. In this article, we'll take a closer look at how to perform the seated bent over lateral raise with proper form and technique.
What is a Seated Bent Over Lateral Raise?
The seated bent over lateral raise is a shoulder exercise that involves bending over at the waist while sitting on a bench and lifting dumbbells straight out to the sides. This movement targets the lateral deltoids, which are the muscles on the sides of the shoulders. It also engages the upper back and traps.
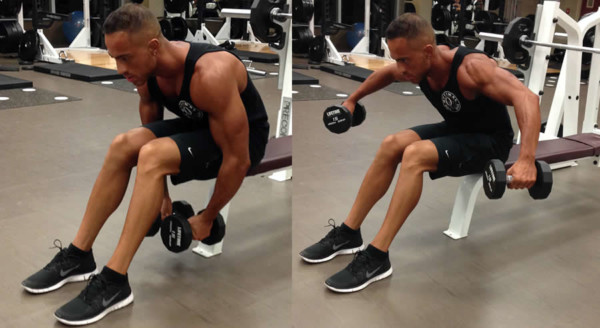
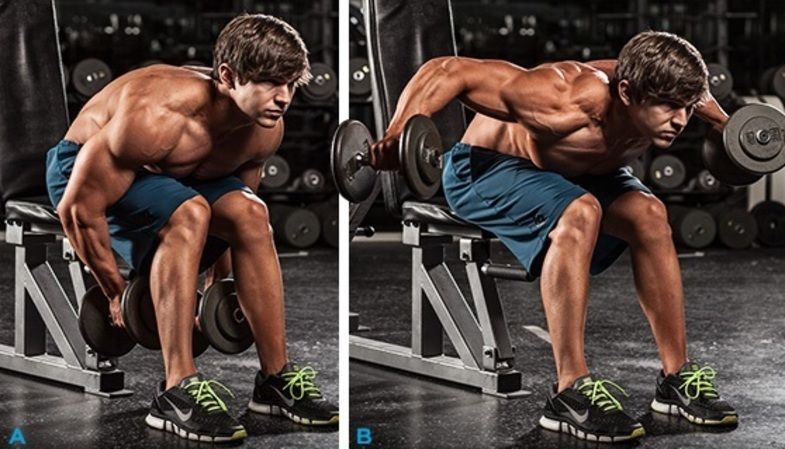
How to Perform a Seated Bent Over Lateral Raise
Here's a step-by-step guide to performing a seated bent over lateral raise:
- Choose a pair of dumbbells that you can lift comfortably for 10-12 reps.
- Sit on a bench with your feet firmly planted on the ground and your back straight.
- Bend forward at the waist until your chest is nearly parallel to the ground.
- Hold the dumbbells with your palms facing inward and your arms straight down to the sides.
- Keeping your arms straight, lift the dumbbells out to the sides until they are level with your shoulders.
- Pause at the top of the movement and squeeze your shoulder blades together.
- Slowly lower the dumbbells back to the starting position.
- Repeat for 10-12 reps for 2-3 sets.
Tips for Proper Form
Proper form is essential for getting the most out of this exercise and preventing injury. Here are some tips to keep in mind:
- Keep your back straight and your chest up throughout the movement.
- Engage your core to stabilize your body.
- Avoid swinging your arms or using momentum to lift the dumbbells.
- Focus on using your shoulder muscles to lift the weight.
- Exhale as you lift the dumbbells and inhale as you lower them.
Variations of the Seated Bent Over Lateral Raise
If you're looking to switch up your shoulder routine, here are some variations of the seated bent over lateral raise:
- Reverse Flyes: Instead of lifting the dumbbells straight out to the sides, lift them diagonally back and out to target the rear deltoids.
- Cable Lateral Raises: Use a cable machine instead of dumbbells to add resistance and challenge your muscles in a different way.
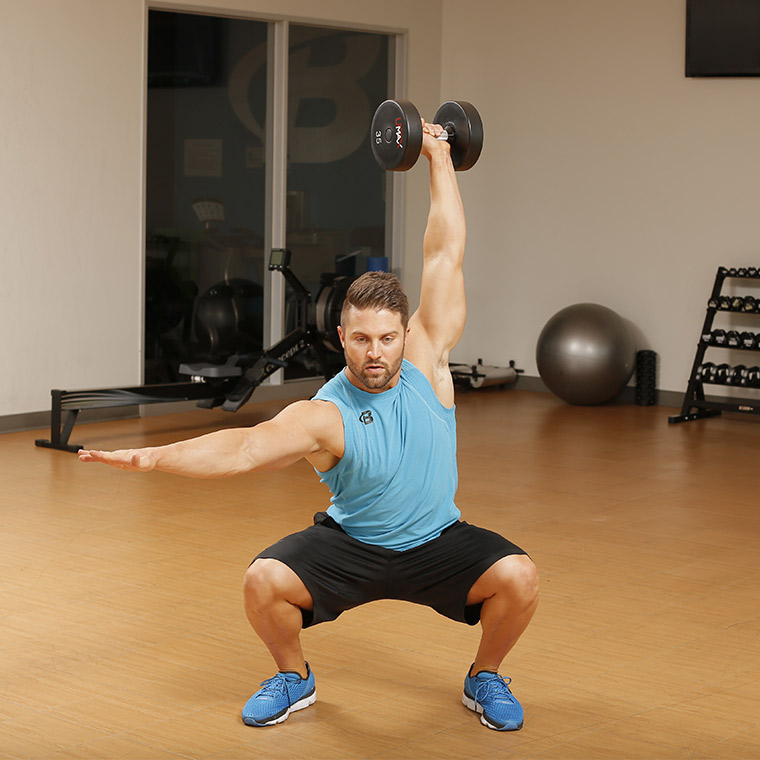
- Arnold Press: This exercise combines a shoulder press with a lateral raise to work all three heads of the deltoids.

The Benefits of Seated Bent Over Lateral Raises
There are several benefits to adding seated bent over lateral raises to your shoulder workout:
- Target the lateral deltoids: This exercise is one of the best for isolating and strengthening the muscles on the sides of the shoulders.
- Improve posture: The seated bent over position helps to strengthen the upper back and improve posture.
- Enhance shoulder definition: By building stronger shoulders, you'll achieve a more defined and sculpted upper body.
Conclusion
The seated bent over lateral raise is a great exercise for targeting the lateral deltoids and improving overall shoulder strength and definition. By following proper form and incorporating variations into your routine, you'll be well on your way to achieving a stronger, more chiseled upper body.
Related video of Seated Bent Over Lateral Raise: A Guide to Perfecting Your Shoulder Workout

Are you looking for a challenging and effective exercise to add to your workout routine? Look no further than dumbbell bench step ups! This exercise is a great way to target your lower body muscles while also improving your balance and stability.
What are Dumbbell Bench Step Ups?

Dumbbell bench step ups involve stepping up onto a bench or elevated platform while holding dumbbells in each hand. The movement targets your quadriceps, glutes, and hamstrings, while also engaging your core and improving your balance.
How to Perform Dumbbell Bench Step Ups
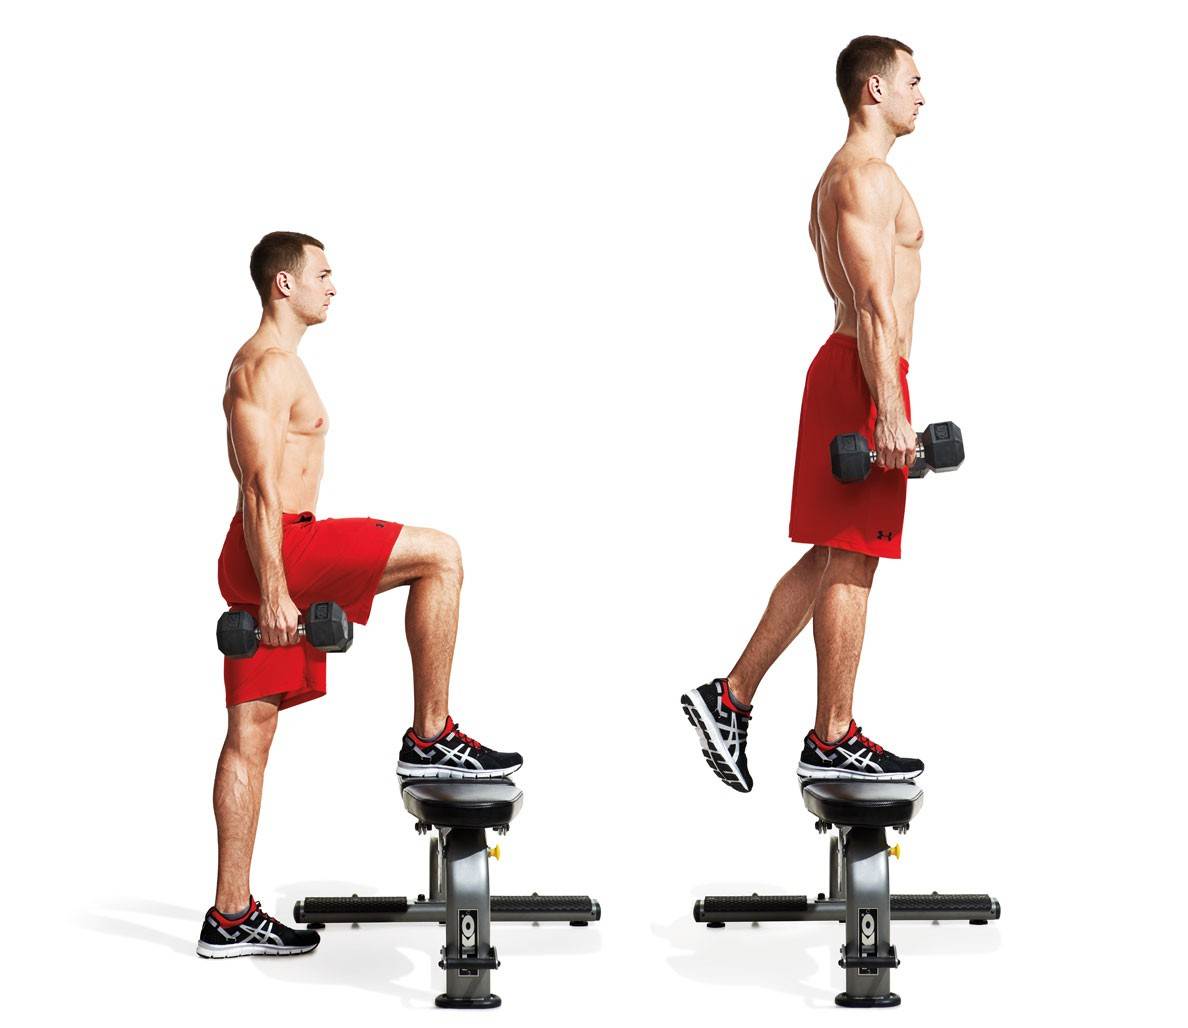
To perform dumbbell bench step ups:
- Stand facing a bench or elevated platform with a dumbbell in each hand.
- Place one foot onto the bench, keeping your weight in your heel.
- Push through your heel to lift your body up onto the bench, bringing your other foot up to meet the first.
- Slowly lower yourself back down to the ground, keeping your weight in your heel and avoiding letting your knee cave inwards.
- Repeat for the desired number of reps before switching to the other leg.
Tips for Proper Form

When performing dumbbell bench step ups, it's important to maintain proper form to avoid injury and to effectively target the desired muscles. Here are some tips for proper form:
- Keep your weight in your heel to target your glutes and hamstrings.
- Keep your knee aligned with your toes to avoid straining your knee joint.
- Avoid letting your knee cave inwards, which can put unnecessary stress on your knee joint and potentially lead to injury.
- Engage your core to maintain stability throughout the movement.
- Choose a weight that challenges you but allows you to maintain proper form throughout the exercise.
Variations

There are several variations of dumbbell bench step ups that you can incorporate into your workout routine to keep things interesting and challenge your muscles in different ways. Here are a few variations to try:
- Single-leg dumbbell bench step ups: Instead of alternating legs, perform all reps on one leg before switching to the other leg.
- Reverse dumbbell bench step ups: Start with one foot on the bench and step down with the other foot, then repeat on the other side.
- Lateral dumbbell bench step ups: Instead of stepping straight onto the bench, step sideways onto the bench, then step back down to the ground.
Benefits of Dumbbell Bench Step Ups

Dumbbell bench step ups offer several benefits, including:
- Targeting your lower body muscles, including your quadriceps, glutes, and hamstrings.
- Improving your balance and stability.
- Engaging your core muscles.
- Providing a challenging workout that can help you build strength and endurance.
Conclusion
Dumbbell bench step ups are a great exercise to add to your workout routine if you're looking to target your lower body muscles and improve your balance and stability. By following proper form and incorporating variations into your routine, you can challenge your muscles in different ways and continue to make progress towards your fitness goals.
Related video of Dumbbell Bench Step Ups
If you're looking for a simple yet effective exercise to strengthen your core muscles, look no further than the recliner elbow to knee tuck. This exercise requires no equipment and can be done in the comfort of your own home.
What Are Recliner Elbow To Knee Tucks?

Recliner elbow to knee tucks are a variation of the traditional abdominal crunch. Instead of performing the crunch on the floor, you do it while lying in a reclined position. This makes the exercise easier on your back and neck while still targeting your core muscles.
How to Do Recliner Elbow To Knee Tucks
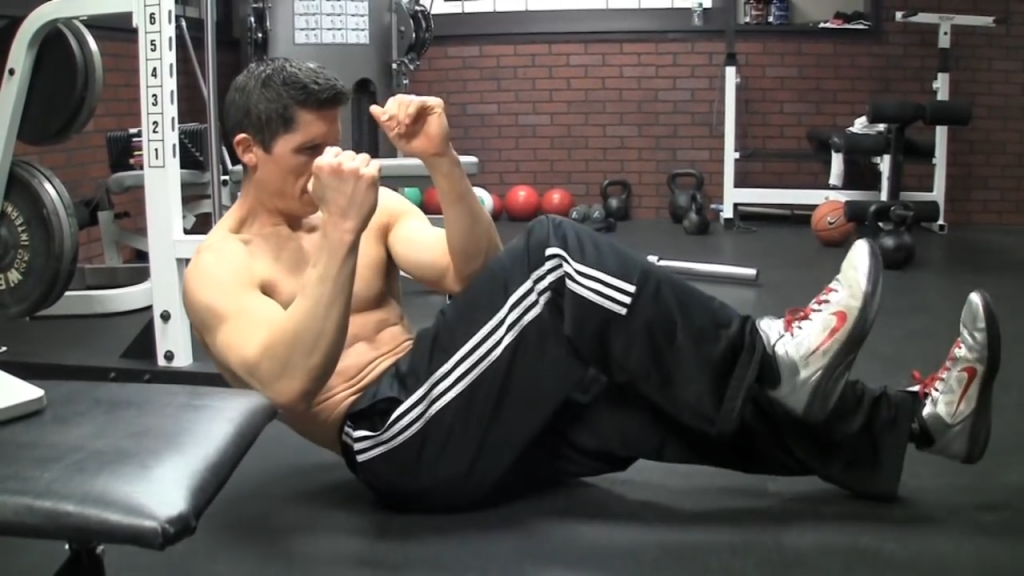
To perform recliner elbow to knee tucks, follow these steps:
- Lie down on your back in a reclined position with your knees bent and your feet flat on the floor.
- Place your hands behind your head, keeping your elbows out to the sides.
- Contract your abs and lift your shoulders off the ground, bringing your left elbow towards your right knee.
- Lower your shoulders back down to the ground and repeat the movement, this time bringing your right elbow towards your left knee.
- Continue alternating sides for the desired number of reps.
Benefits of Recliner Elbow To Knee Tucks

Recliner elbow to knee tucks are a great exercise for strengthening your core muscles, which are essential for maintaining proper posture, balance, and stability. By regularly performing this exercise, you can improve your overall core strength and reduce your risk of back pain and other injuries.
Tips for Performing Recliner Elbow To Knee Tucks

Follow these tips to get the most out of your recliner elbow to knee tucks:
- Keep your elbows out to the sides to avoid straining your neck.
- Focus on using your abs to lift your shoulders off the ground rather than pulling on your neck.
- Breathe out as you lift your shoulders and bring your elbow towards your knee, and breathe in as you lower back down.
- Start with a small number of reps and gradually increase as you get stronger.
- Make sure to engage your core throughout the entire movement, not just when lifting your shoulders off the ground.
Conclusion
Recliner elbow to knee tucks are a simple yet effective exercise for strengthening your core muscles. By incorporating this exercise into your workout routine, you can improve your overall core strength, reduce your risk of injury, and enhance your overall fitness level.
