
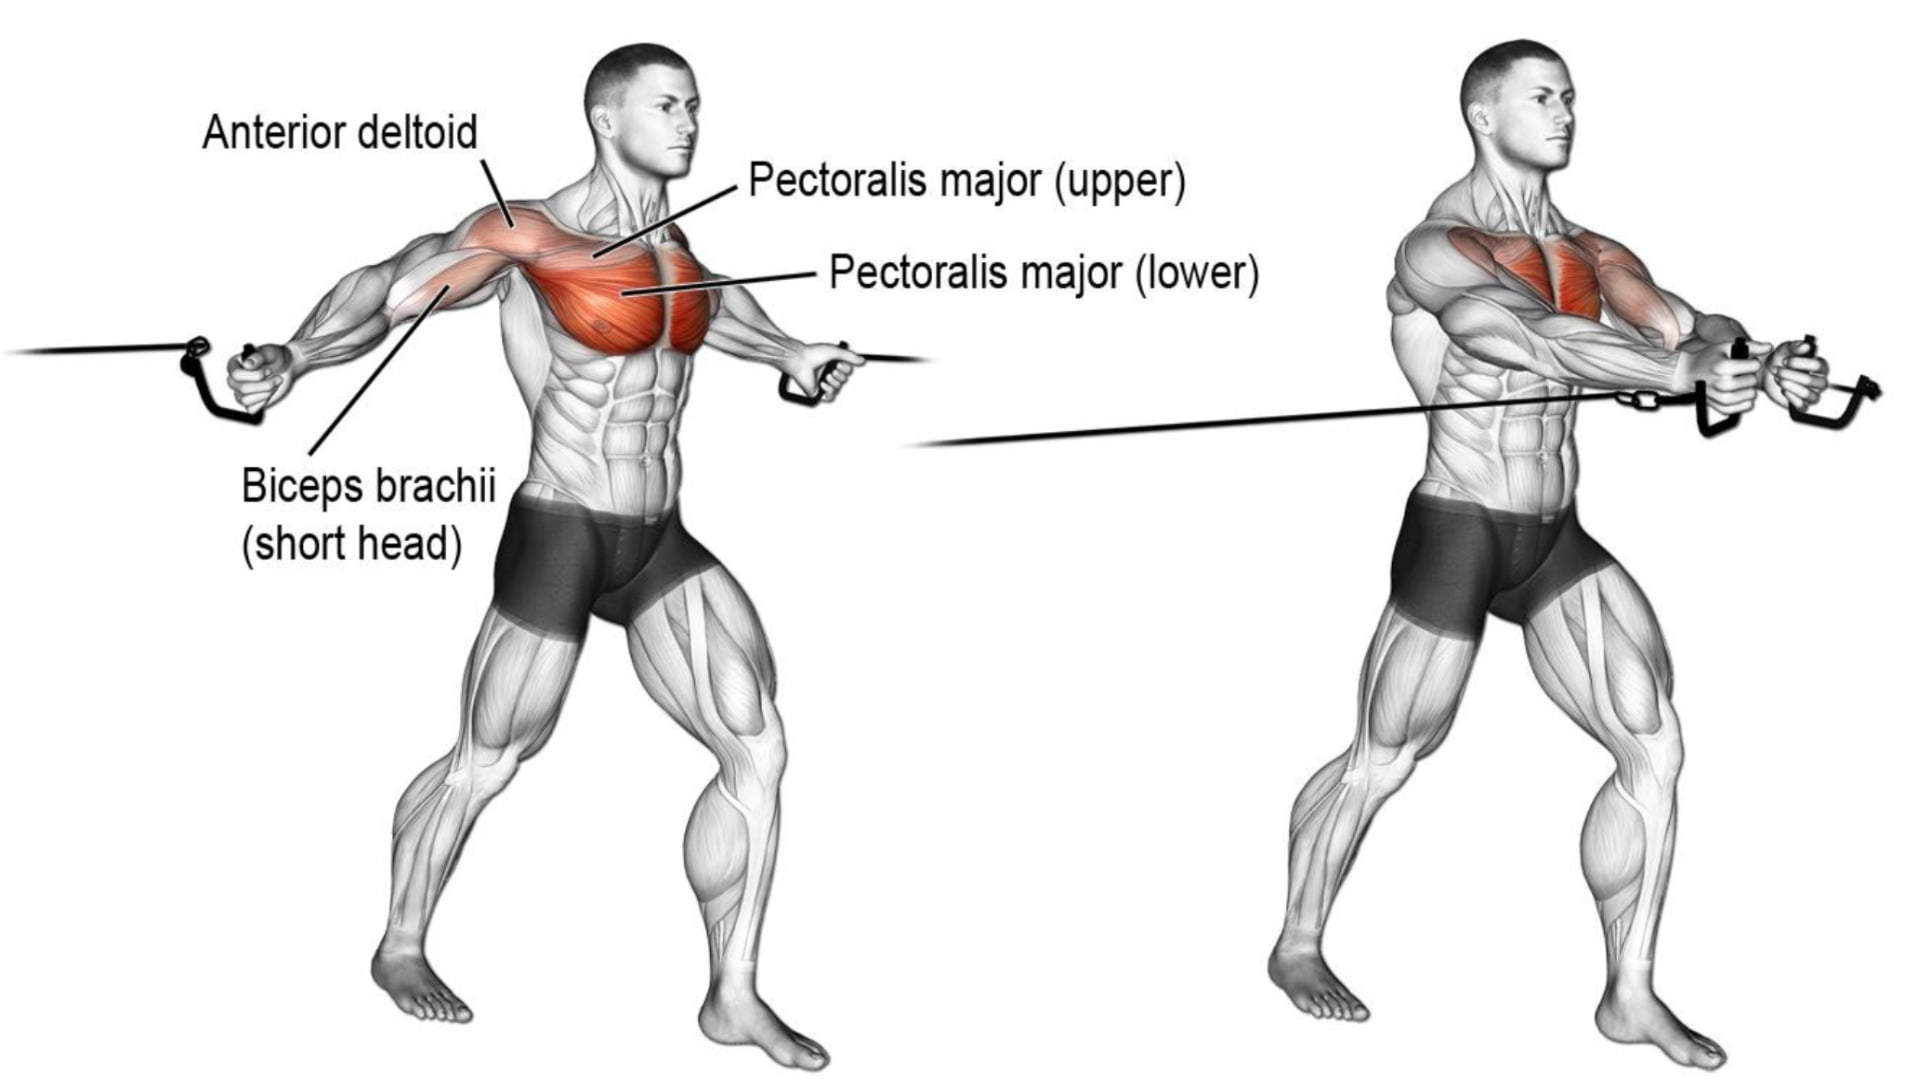
Building a strong and defined chest is a goal for many fitness enthusiasts. While there are several exercises that can help achieve this, cross cable chest exercises are highly effective in targeting the chest muscles. These exercises involve using cable machines, which provide constant tension throughout the movement, leading to better muscle activation.
What are Cross Cable Chest Exercises?
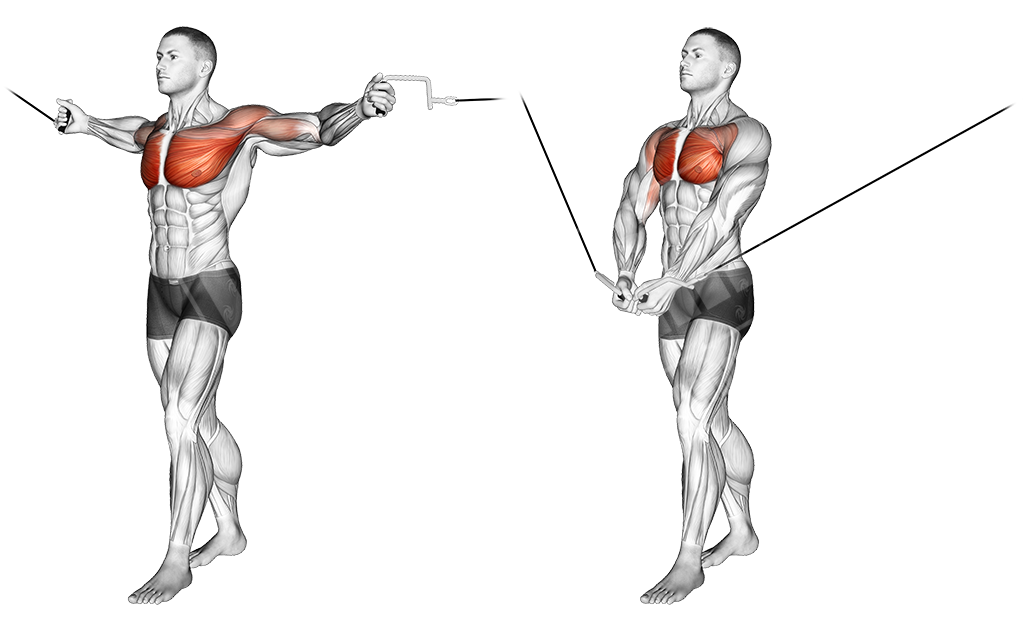
Cross cable chest exercises are a type of resistance training that targets the chest muscles using cable machines. These machines have two adjustable cables that can be set at different heights, allowing for a wide range of exercises.
Some of the most popular cross cable chest exercises include:
- Cable Chest Fly
- Cable Crossover
- Single Arm Cable Chest Press
- Cable Chest Press
- Low Cable Chest Raise
Benefits of Cross Cable Chest Exercises

Cross cable chest exercises offer several benefits, including:
- Increased muscle activation: Cable machines provide constant tension throughout the movement, leading to better muscle activation and growth.
- Improved range of motion: Cable machines allow for a wider range of motion compared to traditional weightlifting exercises, leading to better muscle development.
- Targeted muscle activation: Cross cable chest exercises target the chest muscles specifically, leading to better results compared to exercises that work multiple muscle groups.
- Versatility: Cable machines can be adjusted to perform a wide range of exercises, allowing for a varied and effective workout.
How to Perform Cross Cable Chest Exercises
Performing cross cable chest exercises requires proper form and technique. Here's how to do it:
- Set the cables at the desired height and select the appropriate weight.
- Stand in the center of the cable machine with one foot forward for stability.
- Grab the handles with an overhand grip and step forward, keeping your arms extended in front of you.
- Slowly bring your hands together in a hugging motion, keeping your arms straight.
- Squeeze your chest muscles at the top of the movement and slowly return to the starting position.
- Repeat for the desired number of reps.
Precautions and Tips
Cross cable chest exercises can be highly effective, but it's important to take some precautions and follow these tips:
- Start with a light weight and gradually increase it as your strength improves.
- Focus on proper form and technique, and avoid jerky movements.
- Breathe in during the eccentric (lowering) phase and breathe out during the concentric (lifting) phase.
- Avoid locking your elbows at the top of the movement.
- Consult a fitness professional if you have any injuries or medical conditions.
Conclusion
Cross cable chest exercises are highly effective in targeting the chest muscles and can help achieve a strong and defined chest. These exercises offer several benefits, including increased muscle activation, improved range of motion, targeted muscle activation, and versatility. It's important to follow proper form and technique, start with a light weight, and consult a fitness professional if you have any injuries or medical conditions.
Related video of Cross Cable Chest Exercises

Are you looking for an effective way to target your hips, glutes and thighs? If so, you may want to consider using a resistance band. The hip abductor with resistance band is a simple yet challenging exercise that works your outer thighs and hips. It can help you build strength, improve your balance and stability, and prevent injuries.
What Is the Hip Abductor?

The hip abductor muscles are located on the outer side of your hips. They include the gluteus medius, gluteus minimus, and tensor fasciae latae. These muscles are responsible for moving your legs away from your body's midline and stabilizing your pelvis during activities like walking, running, and jumping.
How to Do the Hip Abductor With Resistance Band
To perform the hip abductor with resistance band, follow these steps:
- Attach a resistance band to a sturdy object, such as a door handle or pole.
- Place the band around your ankles and stand with your feet hip-width apart and your arms at your sides.
- Step away from the anchor point until you feel tension in the band.
- Shift your weight to your left foot and lift your right foot off the ground.
- Keeping your left knee slightly bent, lift your right leg out to the side as far as you can without losing your balance or letting your pelvis tilt.
- Pause for a second and then return to the starting position.
- Repeat for 10 to 15 reps on each side.
Variations of the Hip Abductor With Resistance Band

Here are some variations of the hip abductor with resistance band that you can try:
- Standing hip abductor: Stand with your feet hip-width apart and place the band around your ankles. Lift your right leg out to the side, keeping your knee straight. Lower it back down and repeat for 10 to 15 reps on each side.
- Seated hip abductor: Sit on a chair or bench with the band around your ankles. Lift your right leg out to the side, keeping your knee straight. Lower it back down and repeat for 10 to 15 reps on each side.
- Side-lying hip abductor: Lie on your left side with the band around your ankles. Lift your right leg up as high as you can without letting your pelvis tilt. Lower it back down and repeat for 10 to 15 reps on each side.
Tips for Doing the Hip Abductor With Resistance Band

Here are some tips to help you get the most out of your hip abductor with resistance band workout:
- Start with a light resistance band and gradually increase the tension as you get stronger.
- Engage your core muscles to maintain proper form and prevent lower back pain.
- Keep your feet parallel and avoid letting your toes turn inward or outward.
- Use slow, controlled movements and avoid jerking or bouncing.
- Breathe deeply and exhale as you lift your leg.
Benefits of the Hip Abductor With Resistance Band

The hip abductor with resistance band offers a variety of benefits, including:
- Improved hip and thigh strength
- Better balance and stability
- Reduced risk of hip, knee, and ankle injuries
- Enhanced athletic performance
- Increased calorie burn and fat loss
Conclusion
The hip abductor with resistance band is a versatile and effective exercise that can help you tone and strengthen your outer thighs and hips. By incorporating this exercise into your fitness routine, you can improve your balance, stability, and overall athletic performance. Remember to start with a light resistance band and gradually increase the tension as you get stronger. Use proper form, breathe deeply, and enjoy the benefits of this challenging yet rewarding exercise!
Related video of Hip Abductor With Resistance Band: Benefits, Exercises and Techniques

If you are looking for a full-body exercise that can improve your strength, power, and stability, then the Single Arm Db Push Press is worth considering. This dynamic movement targets your legs, core, upper back, shoulders, and triceps, helping you build muscle mass and burn fat effectively. In this article, we will go over the key benefits, techniques, and variations of the Single Arm Db Push Press, and show you how to incorporate it into your workout routine.
Benefits of Single Arm Db Push Press

Here are some of the main advantages of including Single Arm Db Push Press in your training program:
- Increased power and explosiveness: As you perform the push press, you generate force from your legs and then transfer it to your upper body, pushing the weight overhead with speed and momentum. This builds power and explosiveness, which can translate to other athletic movements, such as jumping, sprinting, and throwing.
- Better shoulder and upper back development: The push press stimulates the anterior and lateral deltoids, as well as the trapezius and rhomboid muscles, which help stabilize the scapula and spine during the movement. This can improve your posture, reduce your risk of shoulder injuries, and enhance your upper body aesthetics.
- Core and leg strength: To execute the push press properly, you need to brace your core and engage your glutes, quads, and hamstrings to create a stable base of support. This strengthens your abs, lower back, and lower body muscles, providing a solid foundation for other exercises.
- Metabolic conditioning: Because the push press involves multiple muscle groups and high-intensity effort, it can also boost your cardiovascular fitness and calorie burn. This makes it a valuable addition to your conditioning workouts or fat loss programs.
Technique of Single Arm Db Push Press

Here is how to perform the Single Arm Db Push Press properly:
- Stand with your feet shoulder-width apart, holding a dumbbell in one hand at shoulder level, with your elbow bent and your palm facing inward.
- Bend your knees and hips slightly, keeping your core tight and your chest up.
- Drive your heels into the ground and extend your legs explosively, using the momentum to press the weight overhead, fully extending your arm and shrugging your shoulder.
- Lower the weight back to your shoulder by bending your elbow and catching it with control.
- Repeat for the desired number of reps, then switch sides.
Make sure to keep your wrist neutral, avoid over-arching your lower back or leaning too far forward, and focus on breathing in and out rhythmically throughout the movement.
Variations of Single Arm Db Push Press

Here are some ways to modify the Single Arm Db Push Press to suit your fitness level or training goals:
- Single-arm dumbbell push jerk: This version of the exercise involves a deeper dip and a quicker transition between the leg drive and the arm press, allowing you to lift heavier weights and increase the speed of the movement.
- Kettlebell push press: If you don't have access to dumbbells, you can use kettlebells instead, by holding them by the horns and following the same technique as the Single Arm Db Push Press.
- Barbell push press: For advanced lifters, the barbell push press is a challenging variation that requires greater coordination, stability, and upper body strength. To perform it, hold a barbell in front of your shoulders, with your palms facing forward, and execute the push press as usual.
Conclusion
The Single Arm Db Push Press is a versatile and effective exercise that can help you develop strength, power, and stability in multiple muscle groups. By incorporating it into your workouts, you can challenge your body in new ways, improve your athletic performance, and achieve your fitness goals faster. Remember to start with lighter weights and focus on proper form before increasing the load, and always consult with a qualified fitness professional if you have any medical conditions or injuries.
Related video of Single Arm Db Push Press: Benefits, Techniques and Variations

Introduction
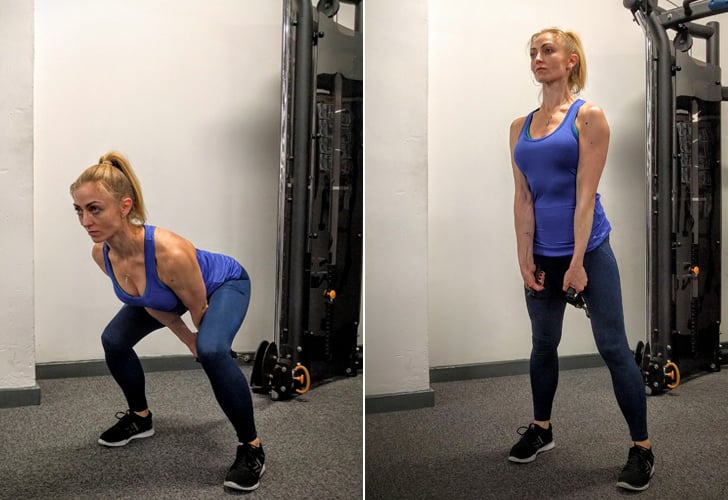
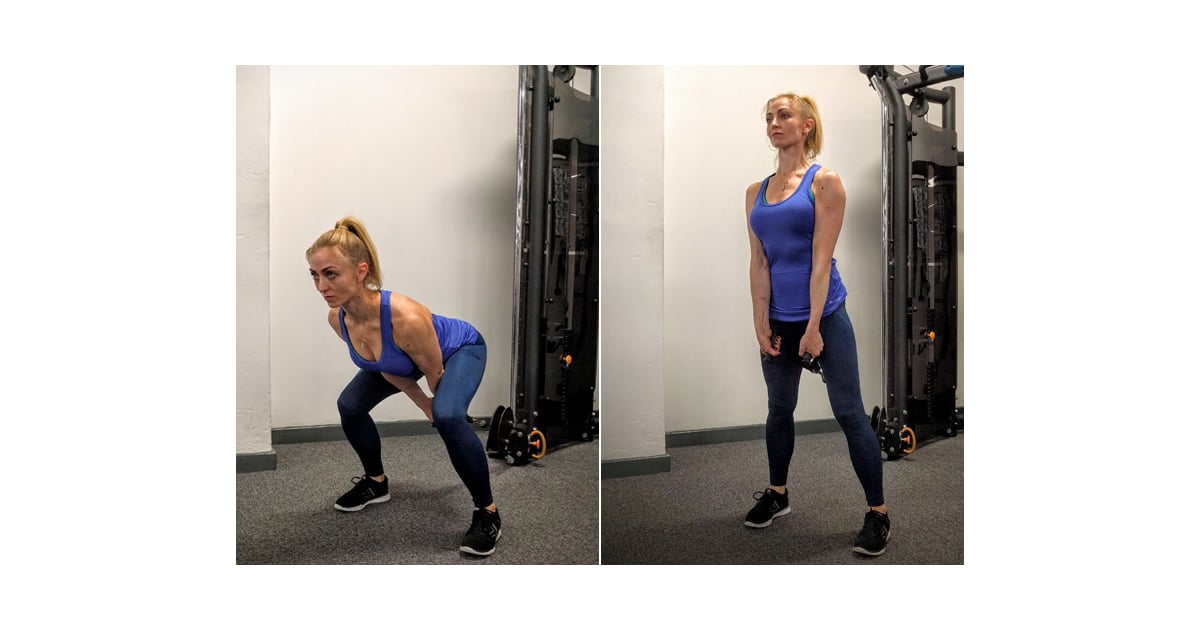
If you're looking to build stronger hamstrings, glutes, and lower back, then the stiff leg deadlift with dumbbells is an excellent exercise to incorporate into your workout routine. This exercise targets the posterior chain muscles and improves your overall strength and stability. In this article, we'll cover everything you need to know about performing a stiff leg deadlift with dumbbells.Equipment Needed
To perform a stiff leg deadlift with dumbbells, you'll need a pair of dumbbells. You can use any weight that you're comfortable with, but it's recommended to start with lighter weights until you're familiar with the exercise.Step-by-Step Guide
1. Begin by standing with your feet shoulder-width apart and your knees slightly bent.

2. Hold the dumbbells in each hand with an overhand grip and let them hang down in front of your thighs.

3. Keeping your back straight and your core engaged, hinge forward at the hips, lowering the dumbbells towards the ground.

4. Lower the dumbbells as far as you can without rounding your back or bending your knees too much.

5. Pause for a moment at the bottom of the movement and feel the stretch in your hamstrings.

6. Slowly raise the dumbbells back up to the starting position, squeezing your glutes and hamstrings as you stand up.

7. Repeat for your desired number of reps.
Tips for Proper Form
- Keep your back straight and your core engaged throughout the movement.
- Avoid rounding your back or bending your knees too much.
- Focus on hinging at the hips and keeping your weight on your heels.
- Squeeze your glutes and hamstrings as you stand up.
- Start with lighter weights and gradually increase the weight as you get stronger.
Variations
If you're looking to switch things up or target different muscles, here are a few variations of the stiff leg deadlift with dumbbells:
- Single-leg stiff leg deadlift with dumbbells

- Stiff leg deadlift with barbell

- Romanian deadlift with dumbbells

Conclusion
The stiff leg deadlift with dumbbells is an effective exercise for building strength in your hamstrings, glutes, and lower back. By following the proper form and gradually increasing the weight, you can see significant improvements in your overall strength and stability. Give it a try in your next workout and see the results for yourself!Related video of Stiff Leg Deadlift With Dumbbells: The Ultimate Guide
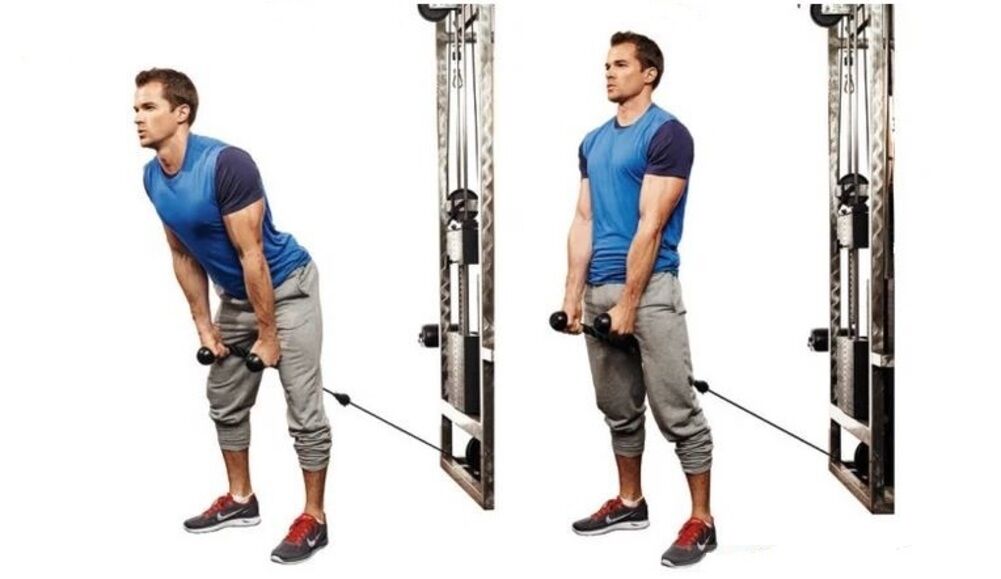
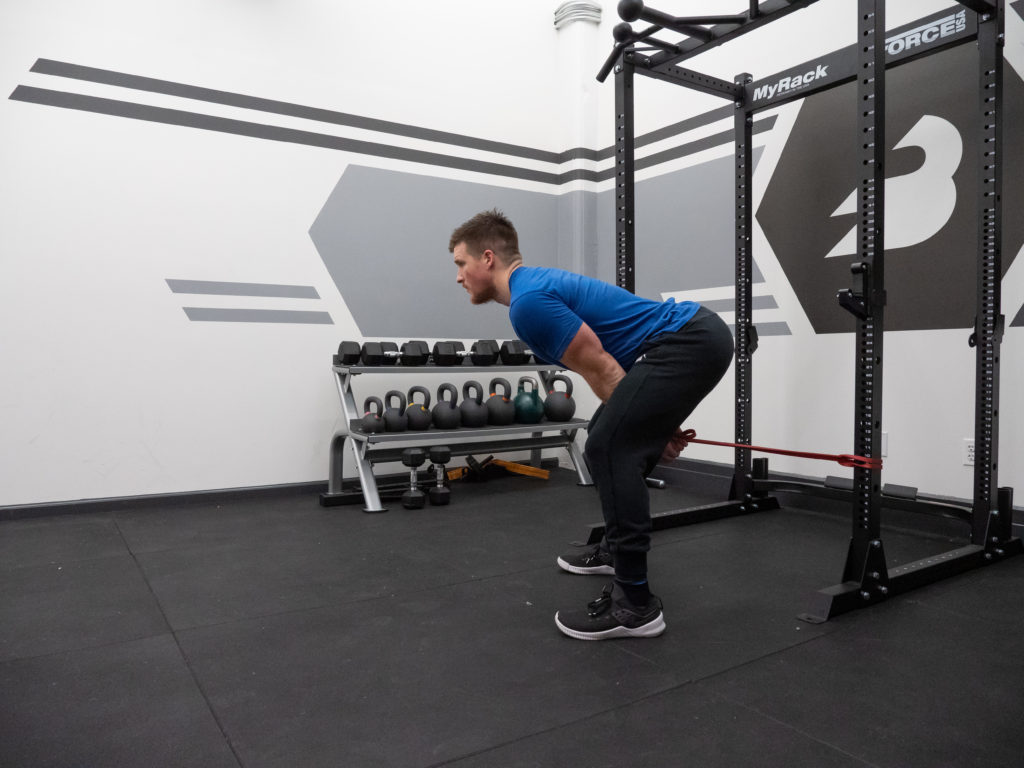
If you're looking for an exercise that can help you build strong glutes and hamstrings, the pull through cable exercise is a great option. This exercise is performed using a cable machine and is known for its ability to target the muscles in the lower body. In this guide, we will take a closer look at the pull through cable exercise and how you can perform it correctly.
What is the Pull Through Cable Exercise?
The pull through cable exercise is a strength training exercise that targets the glutes and hamstrings. It involves using a cable machine with a rope attachment that is attached to the low pulley. The exercise is performed by standing with your back facing the machine and grabbing the rope with both hands between your legs.

How to Perform the Pull Through Cable Exercise
To perform the pull through cable exercise, follow these steps:
- Set the cable machine to the low pulley.
- Attach the rope to the pulley.
- Stand with your back facing the machine and your feet shoulder-width apart.
- Grab the rope with both hands between your legs.
- With a slight bend in your knees, hinge at the hips and lower your upper body towards the floor. Keep your back straight and your core engaged.
- Push your hips forward and stand back up to the starting position.
- Repeat for the desired number of reps.

Tips for Performing the Pull Through Cable Exercise
Here are some tips to help you perform the pull through cable exercise correctly:
- Keep your back straight and your core engaged throughout the exercise.
- Lower your upper body towards the floor by hinging at the hips, not by bending your knees.
- Push your hips forward to stand back up to the starting position.
- Use a weight that challenges you but allows you to maintain proper form.
Benefits of the Pull Through Cable Exercise
The pull through cable exercise offers several benefits, including:
- Targeting the glutes and hamstrings, which are important muscles for lower body strength and power.
- Improving hip mobility and flexibility.
- Helping to prevent lower back pain and injury.
- Providing a low-impact exercise option that is easy on the joints.
Variations of the Pull Through Cable Exercise
There are several variations of the pull through cable exercise that you can try to target different muscles or add variety to your workout:
- Single-leg pull through
- Wide stance pull through
- Reverse grip pull through
- Sumo stance pull through
Incorporating the Pull Through Cable Exercise into Your Workout
The pull through cable exercise can be incorporated into your lower body or full body workout routine. It is recommended to perform 3-4 sets of 8-12 reps with a weight that challenges you but allows you to maintain proper form. It is also important to warm up properly before performing the exercise.

Conclusion
The pull through cable exercise is a great exercise for building strong glutes and hamstrings. It is important to perform the exercise correctly and with proper form to avoid injury and get the most benefit from the exercise. Incorporating the pull through cable exercise into your workout routine can help improve lower body strength and mobility.
Related video of Pull Through Cable Exercise: A Guide to Building Strong Glutes and Hamstrings

If you're looking for a lower body exercise that can strengthen your glutes, hamstrings and quads while also engaging your core, look no further than elevated dumbbell sumo squats.
Benefits of Elevated Dumbbell Sumo Squats

Elevated dumbbell sumo squats offer a wide range of benefits for your body. Here are just a few:
- Strengthens glutes, hamstrings and quads
- Engages core muscles
- Improves balance and stability
- Increases lower body strength
- Enhances athletic performance
Technique for Elevated Dumbbell Sumo Squats

Before you start doing elevated dumbbell sumo squats, make sure you have the proper technique. Here's how to do it:
- Start by standing with your feet wider than shoulder-width apart, toes pointing outwards at a 45-degree angle.
- Place a step or platform behind you and hold a dumbbell in each hand at your sides.
- Bend your knees and lower your hips until your thighs are parallel to the ground.
- Pause briefly at the bottom of the squat, then push through your heels to return to the starting position.
- Repeat for your desired number of reps.
Variations of Elevated Dumbbell Sumo Squats

There are several variations of elevated dumbbell sumo squats that you can try to target different muscles and add variety to your workout. Here are a few:
- Elevated Dumbbell Sumo Squat with Calf Raise: At the top of the squat, rise up onto your toes and hold for a few seconds before lowering back down.
- Elevated Dumbbell Sumo Squat with Overhead Press: Perform the squat as usual, but when you rise back up, press the dumbbells overhead.
- Elevated Dumbbell Sumo Deadlift: Instead of squatting, hinge at the hips and lower the dumbbells towards the ground, keeping your back straight.
Tips for a Safe and Effective Workout

To get the most out of your elevated dumbbell sumo squats and avoid injury, keep these tips in mind:
- Start with a lighter weight and focus on your form before increasing the weight.
- Don't let your knees cave inwards - keep them in line with your toes.
- Engage your core muscles throughout the exercise to maintain stability.
- Breathe deeply and steadily throughout the movement.
- Take breaks as needed and listen to your body.
Conclusion
Elevated dumbbell sumo squats are a great exercise for anyone looking to strengthen their lower body and improve their overall fitness. By following proper technique and incorporating variations into your routine, you can target different muscles and avoid boredom. Remember to start with a lighter weight and focus on your form to avoid injury, and have fun with your workout!
Related video of Elevated Dumbbell Sumo Squats: Benefits, Technique and Variations
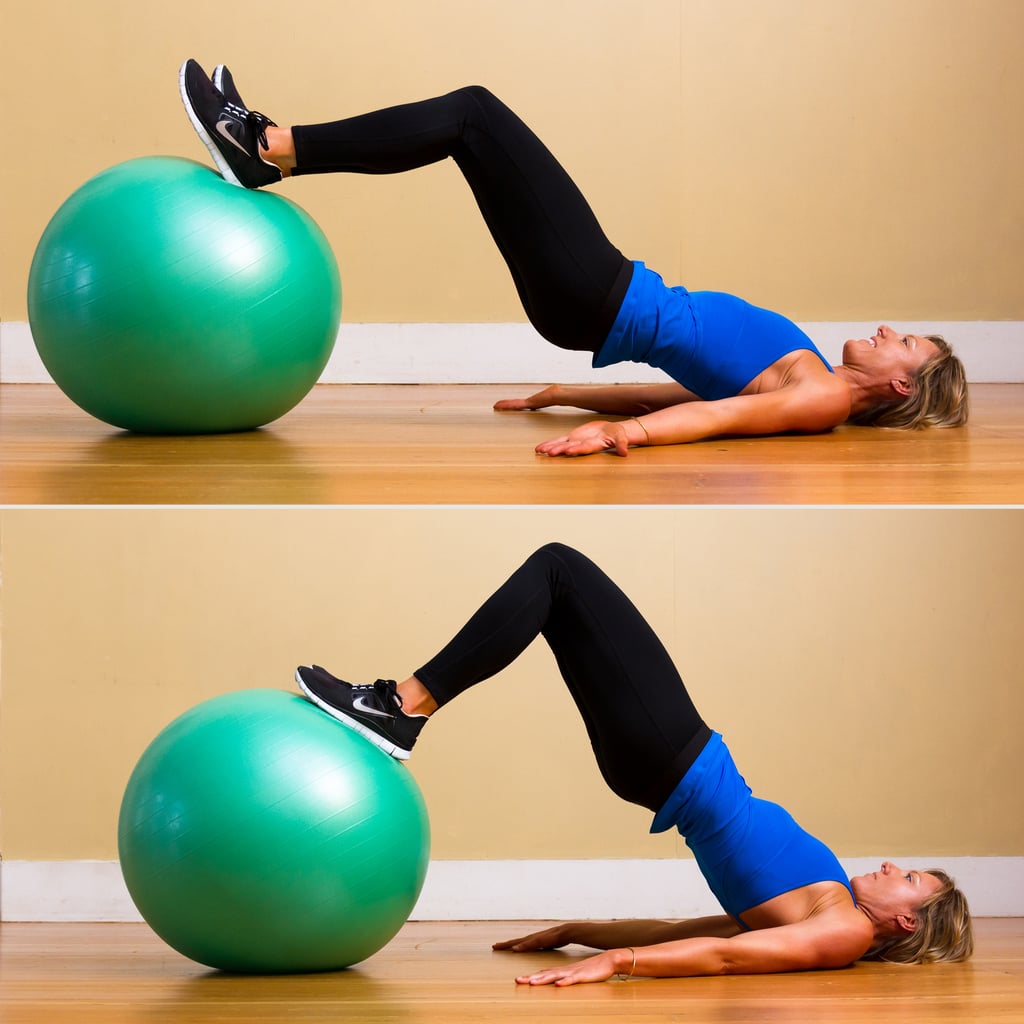
Are you looking for an effective way to tone your hamstrings? Look no further than stability ball hamstring curls! This exercise targets the muscles at the back of your thighs, giving you the toned and defined look you desire.
What are Stability Ball Hamstring Curls?

Stability ball hamstring curls are a bodyweight exercise that require a stability ball. You lie on your back with your feet on the ball and lift your hips off the ground. From this position, you bend your knees and roll the ball towards your buttocks, then straighten your legs again.
This exercise is great for toning your hamstrings, as well as your glutes and lower back muscles. It also improves your balance and stability, since you have to keep the ball steady while you perform the movement.
How to Perform Stability Ball Hamstring Curls

Follow these steps to perform stability ball hamstring curls:
- Lie on your back with your arms at your sides and your feet on the ball.
- Engage your core and lift your hips off the ground, so your body forms a straight line from your shoulders to your feet.
- Bend your knees and roll the ball towards your buttocks, keeping your hips lifted.
- Squeeze your hamstrings to bring the ball back to the starting position, straightening your legs as you do so.
- Repeat for 10-15 reps, then lower your hips back to the ground.
Remember to keep your core engaged and your hips lifted throughout the exercise. You should also avoid arching your back or letting your hips drop.
Variations of Stability Ball Hamstring Curls

There are several variations of stability ball hamstring curls that you can try to make the exercise more challenging:
- Single-leg curls: Perform the exercise with one leg at a time, keeping the other leg straight and lifted off the ball.
- Elevated feet curls: Place your feet on a bench or step instead of the ball, so your hips are higher off the ground.
- Weighted curls: Hold a dumbbell or kettlebell on your hips while you perform the exercise.
These variations can help you progress and challenge your muscles even further.
Benefits of Stability Ball Hamstring Curls

Stability ball hamstring curls offer several benefits:
- Tones and strengthens your hamstrings, glutes, and lower back muscles.
- Improves your balance and stability.
- Requires no equipment other than a stability ball.
- Can be modified to increase or decrease the difficulty.
- Can be done at home or at the gym.
If you're looking for an exercise that targets your hamstrings and offers a range of benefits, stability ball hamstring curls are a great choice.
Incorporating Stability Ball Hamstring Curls into Your Workout

Stability ball hamstring curls can be incorporated into your lower body or full-body workout. Here are some ideas:
- Pair stability ball hamstring curls with squats or lunges for a complete lower body workout.
- Add stability ball hamstring curls to your core routine for an extra challenge.
- Incorporate stability ball hamstring curls into a full-body circuit that includes upper body and core exercises.
Remember to warm up before you perform any exercise, and cool down afterwards. You should also stretch your hamstrings and other muscles after the workout to prevent tightness and soreness.
Conclusion
Stability ball hamstring curls are a versatile and effective exercise that can help you tone and strengthen your hamstrings, glutes, and lower back muscles. Whether you're a beginner or an advanced exerciser, you can modify the exercise to suit your fitness level and goals.
Try incorporating stability ball hamstring curls into your workout routine and see the results for yourself!
Related video of Stability Ball Hamstring Curls: The Ultimate Guide

Introduction
A corkscrew is a tool that is used to remove the cork from a wine bottle. It is a simple but essential tool that every wine lover should own. Corkscrews come in different shapes and sizes, and each one has a unique design that makes it easy to use.
History of Corkscrew
The corkscrew was invented in the 17th century, and it has been used ever since. The first corkscrews were made of wood and had a simple design. Over time, corkscrews evolved, and new designs were introduced. Today, there are many different types of corkscrews available.

Types of Corkscrews
There are several types of corkscrews available, including the waiter's corkscrew, winged corkscrew, lever corkscrew, and electric corkscrew. Each type of corkscrew has its own unique features that make it easy to use.
Waiter's Corkscrew
The waiter's corkscrew is the most common type of corkscrew. It is a simple tool that has a small blade for cutting the foil, a screw for removing the cork, and a lever for pulling the cork out of the bottle. It is called a "waiter's" corkscrew because it is commonly used by waiters in restaurants.

Winged Corkscrew
The winged corkscrew, also known as the butterfly corkscrew, has two metal arms that extend from the sides of the corkscrew. These arms are used to grip the neck of the bottle while the screw is turned. Once the screw is fully inserted, the wings are raised, and the cork is lifted out of the bottle.

Lever Corkscrew
The lever corkscrew is a type of corkscrew that uses a lever to remove the cork from the bottle. It has a T-shaped handle that is used to turn the screw. Once the screw is inserted, the lever is lowered, and the cork is pulled out of the bottle.

Electric Corkscrew
The electric corkscrew is a modern invention that uses electricity to remove the cork from the bottle. It has a motor that rotates the screw, making it easy to remove the cork. It is a popular tool for people who have difficulty using traditional corkscrews.

How to Use a Corkscrew
Using a corkscrew is a simple process. First, remove the foil from the top of the bottle. Next, place the tip of the screw in the center of the cork and twist it into the cork. Once the screw is fully inserted, use the tool's lever or handle to pull the cork out of the bottle. Be careful not to twist the cork as you pull it out, as this can cause it to break.

Caring for Your Corkscrew
To ensure that your corkscrew lasts for years, it is important to care for it properly. After each use, clean the corkscrew with warm water and soap. Dry it thoroughly before storing it. Avoid using harsh chemicals or abrasive materials, as this can damage the corkscrew's surface.
Conclusion
A corkscrew is an essential tool for any wine lover. With so many different types of corkscrews available, there is a tool to suit every need. Whether you prefer a traditional waiter's corkscrew or a modern electric corkscrew, using a corkscrew is a simple process that will make opening a bottle of wine easy and enjoyable.